Updates and help
Sprocket lets you know when a newer version is out and, on most downloads, installs it for you with one click. The Help menu is also where you check which version you have, find the log files to send along with a problem report, and see the open-source software Sprocket is built on.
What’s in this guide
Section titled “What’s in this guide”- How you’ll know an update is ready
- Install an update
- Check for updates yourself
- Portable downloads update by hand
- Turn off the startup check
- See your version and find the log files
- Third-party notices
- Add Sprocket to the Linux applications menu
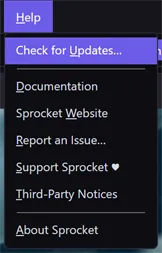
- Other Help menu links
- Related
How you’ll know an update is ready
Section titled “How you’ll know an update is ready”Each time it starts, Sprocket quietly checks whether a newer version has been published. Nothing downloads or installs unless you say so, and nothing interrupts your editing. When there’s an update:
- A notice pops up once at the bottom-right of the window — Sprocket (version) is available. — with a View button. It fades away on its own after a few seconds, or you can close it with its ×. You only see it the first time Sprocket finds that version.
- A badge appears in the status bar at the bottom of the window, reading Update followed by the version number. It stays there until you install the update or skip that version. Click it to see the details.
- A small dot appears next to the Help menu, and next to Check for Updates… inside it, so the update is easy to find even if you missed the badge.
The badge’s dot changes color the longer an update waits: grey when it’s new, the accent color after a couple of days, and amber after a week, when the badge changes to Update recommended. It’s a gentle reminder — it never gets in your way.
Install an update
Section titled “Install an update”- Click the Update badge in the status bar, click View on the pop-up notice, or choose Help ▸ Check for Updates…. The Update Available window opens.
- Read what’s changed. The window names the new version and the one you’re running, and lists what’s new in the release. For the full notes, click Full Release Notes to open that release’s page in your web browser.
- Choose what to do:
- Install & Restart — downloads the update, with a progress bar, then closes Sprocket and reopens it on the new version.
- Later — closes the window. The badge stays, so you can come back to it.
- Skip This Version — hides the badge and the dot for this version. When a newer version comes out, you’ll hear about that one as usual.
Tip: Save your project before you click Install & Restart — Sprocket closes to finish the update.
If the download fails, the window says why and you can carry on working. You can try again later, or download the new version yourself from the Sprocket releases page.
Check for updates yourself
Section titled “Check for updates yourself”Choose Help ▸ Check for Updates… at any time. Sprocket checks straight away and tells you the result:
- If there’s a newer version, the Update Available window opens (see Install an update).
- If you’re current, it says You are running the latest version, with your version number.
- If it can’t get online, it says it could not reach github.com to check for updates — check your internet connection and try again.
This works even if you’ve turned off the startup check.
Portable downloads update by hand
Section titled “Portable downloads update by hand”The Windows installer, the Linux AppImage, and the Sprocket app you drag into Applications on a Mac all update themselves as described above. The portable zip downloads for Windows and Linux don’t — they run from the folder you unzipped them into and never install anything, so they can’t replace themselves either. Portable copies don’t show the update badge or pop-up notice.
When you choose Help ▸ Check for Updates… in a portable copy, Sprocket tells you which version you’re running and offers to take you to the releases page:
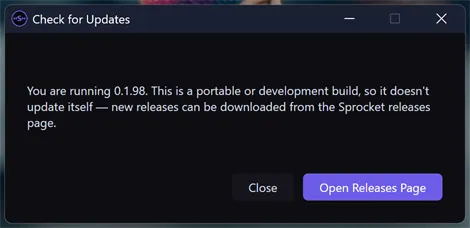
Click Open Releases Page to download the latest version in your web browser, then unzip it in place of the old one.
Turn off the startup check
Section titled “Turn off the startup check”If you’d rather Sprocket didn’t check for updates when it starts:
- Choose Edit ▸ Preferences… (
Ctrl+,). - In the Updates section, clear Check for updates at startup.
- Click OK.
The update badge disappears. You can still check whenever you like with Help ▸ Check for Updates….
See your version and find the log files
Section titled “See your version and find the log files”Choose Help ▸ About Sprocket (on macOS, Sprocket ▸ About Sprocket). The About Sprocket window shows:
- your Version number
- the Media engine version — the video and audio library Sprocket uses to read and write files
- a link to the Sprocket website
- the folder where Sprocket writes its log files
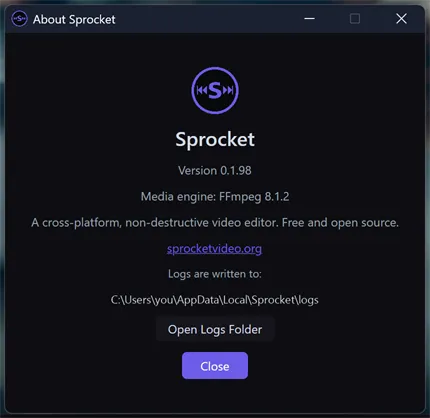
The log files record errors and crashes. If something goes wrong, click Open Logs Folder to open that folder in your file manager. There’s one log file per day, named with the date, so the newest one is easy to spot. You can also select the folder path in the window and copy it.
Tip: When you report a problem, include the version number from this window and attach the log file from the day it happened — it’s often the fastest route to a fix.
Third-party notices
Section titled “Third-party notices”Sprocket is free and open source, and it’s built on other open-source libraries, fonts, and media. Choose Help ▸ Third-Party Notices to see each one with its license. The links in the list open in your web browser.
Add Sprocket to the Linux applications menu
Section titled “Add Sprocket to the Linux applications menu”Linux AppImage only. An AppImage is a single file that runs wherever you put it, so it doesn’t add itself to your applications menu. Sprocket can do that for you.
The first time you run the AppImage, Sprocket asks whether to Add Sprocket to your applications menu:
- Click Add to add a launcher and icon, so Sprocket shows up in your applications menu and dock like any installed app. It’s added for your user account only — no administrator password needed.
- Click Not Now to skip it. Sprocket won’t ask again.
You can change your mind at any time from the Help menu, which shows whichever of these applies:
- Help ▸ Add to Applications Menu — adds the launcher.
- Help ▸ Remove from Applications Menu — removes it again.
If Sprocket doesn’t appear in the menu straight away, log out and back in (or restart your desktop) to refresh the menu.
Tip: If you move the AppImage file to another folder, run it from its new location and choose Help ▸ Remove from Applications Menu, then Help ▸ Add to Applications Menu, so the launcher points at the new spot.
Other Help menu links
Section titled “Other Help menu links”These open in your web browser:
- Documentation — this help site.
- Sprocket Website — sprocketvideo.org.
- Report an Issue… — report a bug or suggest an idea on GitHub.
- Support Sprocket ♥ — help fund Sprocket’s development.
Related
Section titled “Related”- Getting started — which download to use on each platform
- Projects and saving — save your work before an update restarts Sprocket
- Arranging your workspace — where the About and Preferences items live on a Mac