Editing on the timeline
Once you have clips on the timeline, most of your work is trimming and rearranging them: tightening a shot, changing where one clip cuts to the next, closing a gap. Sprocket gives you a row of editing tools for exactly this. This guide explains what each one does and when to reach for it.
If you haven’t yet, start with the Getting started guide — it covers opening a project, the basics of selecting and splitting clips, and the layout of the screen.
Before you start
Section titled “Before you start”You’ll need a project with a few clips on the timeline. The quickest way to follow along is File ▸ Open Sample Project, then split the clip into a few pieces with the Blade tool (see Split a clip with the Blade) so you have several clips to work with.
What’s in this guide
Section titled “What’s in this guide”- The editing tools
- Select — move and trim
- Selecting several clips at once
- The four trim tools: Ripple, Roll, Slip, Slide
- Snapping
- Keeping audio and video together
- Moving clips between tracks
- Renaming and resizing tracks
- Targeting, sync lock, and lock
- Nudging with the keyboard
- Deleting clips and closing gaps
- Cut, copy, and paste
- Splitting a clip at the playhead
- Duplicating a clip
- Turning a clip off without deleting it
- The right-click menu
- Fading a clip in or out
- Changing a clip’s speed
- Freezing a frame (frame hold)
- Duplicate or remove a single frame (stop motion)
- Getting around: Hand and Zoom
- Following the playhead
The editing tools
Section titled “The editing tools”The tools live in a row at the top-left of the window. One tool is active at a time, and the active tool decides what happens when you click or drag a clip on the timeline. Click a tool to switch to it.

- Select, Blade, Ripple, Roll, Slip, and Slide change or rearrange your clips.
- Hand and Zoom just change your view of the timeline — they don’t touch your clips.
- Snapping and Linked (to the right of the tools) are toggles that stay on or off across every tool.
Select is the tool you’ll use most; switch to a specialized tool for a specific edit, then switch back.
The cursor tells you what will happen before you click. Each tool has its own pointer, and it changes shape as you hover over different parts of a clip — over a clip’s edge with Select it becomes a trim bracket, the Blade shows a razor, the trim tools show their own brackets and arrows. The Blade also draws a faint vertical line where your next click will cut, so you can line the cut up exactly before committing to it.
Select — move and trim
Section titled “Select — move and trim”The Select tool (the default) does the two most common things:
- Move a clip — drag it left or right along its track, or up and down to another track.
- Trim a clip — hover over a clip’s left or right edge until the cursor becomes a trim handle, then drag the edge inward to shorten the clip or outward to reveal more of the original footage.
Trimming with Select leaves everything else where it is — shortening a clip opens a gap next to it. If you’d rather close the gap automatically, use the Ripple tool instead.
Selecting several clips at once
Section titled “Selecting several clips at once”Most edits act on one clip, but you can select several and move, delete, or copy them together. With the Select tool:
Ctrl-click a clip to add it to (or remove it from) the selection.Shift-click a clip to extend the selection.- Drag across empty track space to draw a marquee — a selection box that
grabs every clip it touches. Hold
CtrlorShiftwhile you drag to add to what’s already selected. Ctrl+A(Edit ▸ Select All) selects every clip on the timeline.
The selected clips are outlined in the accent colour. One of them — the last one you clicked — is the primary clip, drawn with a brighter outline than the rest:

The primary clip is the one the Inspector shows and the one that dialogs like Speed / Duration act on. Everything else — Delete, Ripple Delete, Cut, Copy, Duplicate, nudging, enabling and disabling — acts on the whole selection as a single undo step. Drag any selected clip and the entire set moves together, keeping their spacing.
The four trim tools: Ripple, Roll, Slip, Slide
Section titled “The four trim tools: Ripple, Roll, Slip, Slide”These four tools all adjust clips that sit next to each other, each in a different way. They’re the tools that separate quick edits from tidy ones, so they’re worth learning. Here’s what each does (the app shows the same description as a tooltip when you hover over the tool):
Ripple
Section titled “Ripple”Trim a clip’s edge, and everything after it shifts to keep the timeline gap-free. Because the downstream clips move, the total length of your video changes.
Reach for Ripple when you want to tighten (or extend) a clip and automatically close (or open) the gap, without leaving a hole to clean up later.

Drag the cut point between two adjacent clips. The first clip’s end and the second clip’s start move together, so their combined length — and everything downstream — stays exactly where it is.
Reach for Roll when a cut happens a beat too early or too late and you want to change where one shot becomes the next, without shifting the rest of your edit.

Change which part of a clip’s footage plays, without moving the clip. The clip keeps its exact position and length on the timeline; only the in and out points into the original footage shift.
Reach for Slip when a clip sits in the right spot and is the right length, but you want to show a different moment from within it. (There’s nothing to animate here — the clip stays exactly where it is; only the footage playing inside it changes.)
Move a clip along the timeline while its neighbours absorb the change. The clip before it lengthens and the clip after it shortens (or the reverse), so the overall length and everything else stay put.
Reach for Slide when you want to reposition a clip that’s sandwiched between two others without leaving a gap.

At a glance
Section titled “At a glance”| Tool | You grab… | What moves | What stays the same |
|---|---|---|---|
| Ripple | a clip’s edge | that clip’s length + everything downstream shifts | no gaps are left |
| Roll | the cut between two clips | where one clip ends and the next begins | total length, everything downstream |
| Slip | a clip’s body | which footage plays inside the clip | the clip’s position and length |
| Slide | a clip’s body | the clip’s position; neighbours resize to fit | total length, everything else |
Tip: Ripple, Roll, and Slide all work on a clip that has a neighbour to act on. Slip needs a clip with unused footage before or after the part you’re using (a clip you’ve already trimmed).
Snapping
Section titled “Snapping”Snapping makes clip edges and the playhead click into place against nearby edits, markers, and the playhead while you drag — so cuts line up cleanly instead of leaving a one-frame sliver. It’s on by default; toggle it from the toolbar if you need to place something freely.
Keeping audio and video together
Section titled “Keeping audio and video together”Linked keeps a video clip and its companion audio joined, so they move, trim, and cut together as one — for a clip that was imported with its own synced sound. It has no effect on unrelated clips: in the sample project, the music on A1 is a separate clip from the video on V1, so cutting one never affects the other.
Turn Linked off when you deliberately want to edit the picture and sound separately — for example, to let the audio from one shot carry over while the video cuts to the next (a “J” or “L” cut).
You can also create or break a link yourself. Select a video clip and an
audio clip (see Selecting several clips at once)
and choose Clip ▸ Link to join them into a linked pair; select a linked clip
and choose Clip ▸ Unlink to separate it. Ctrl+L does whichever one fits
your selection — it links an eligible video-plus-audio selection, or unlinks a
clip that’s already part of a group.
Moving clips between tracks
Section titled “Moving clips between tracks”With the Select tool, drag a clip up or down onto another track of the same kind (video onto a video track, audio onto an audio track). Higher video tracks appear in front, so moving a clip up to V2 places it over whatever is on V1 at the same time. Audio tracks work differently — they don’t cover each other; every audio track plays at once and blends together into the mix, so moving an audio clip to another track changes nothing about how it sounds. Add more tracks with + Track at the top-right of the timeline.
Renaming and resizing tracks
Section titled “Renaming and resizing tracks”Tracks start with plain names like V1 and A1, but you can rename them —
“Music,” “Dialogue,” “Titles” — to keep a busy project straight. Double-click
a track’s name in the header column on the left, type the new name, and press
Enter (or click away) to save it. Escape cancels.
If long names don’t fit, drag the right edge of the header column to make it wider or narrower. The pointer becomes a resize arrow over the edge. (This is just for the current session — the column returns to its default width next time you open the project.)
Targeting, sync lock, and lock
Section titled “Targeting, sync lock, and lock”The bottom row of each track header holds three more toggles, which control how edits treat that track:
- The targeting chip, labelled with the track’s short name (V1, A1…), decides which tracks sequence commands act on — Lift, Extract, Mark Clip, and where a paste lands.
- The lock (padlock) protects the track: its clips can’t be selected, moved, trimmed, or cut, and the lane is drawn hatched.
- The sync lock makes the track shift along when an insert or extract ripples the sequence, so it stays in sync.
If the column is too narrow, sync lock is hidden first, then lock. All three are always on the track’s right-click menu, along with Target All Tracks and Target No Tracks. Tracks start targeted, sync-locked, and unlocked.
While the Source monitor holds a file, a narrow column at the far left of the headers also shows V1 / A1 source indicators, which pick the tracks an Insert or Overwrite lands on. Three-point editing explains all of these in depth.
Nudging with the keyboard
Section titled “Nudging with the keyboard”For small, precise moves, select a clip and nudge it one frame at a time:
Alt+←— nudge the clip leftAlt+→— nudge the clip right
This is handy for lining up a cut to a beat in the music or a specific frame of action.
Deleting clips and closing gaps
Section titled “Deleting clips and closing gaps”There are two ways to remove a clip, and the difference is what happens to the space it leaves behind.
Say you have three clips in a row:
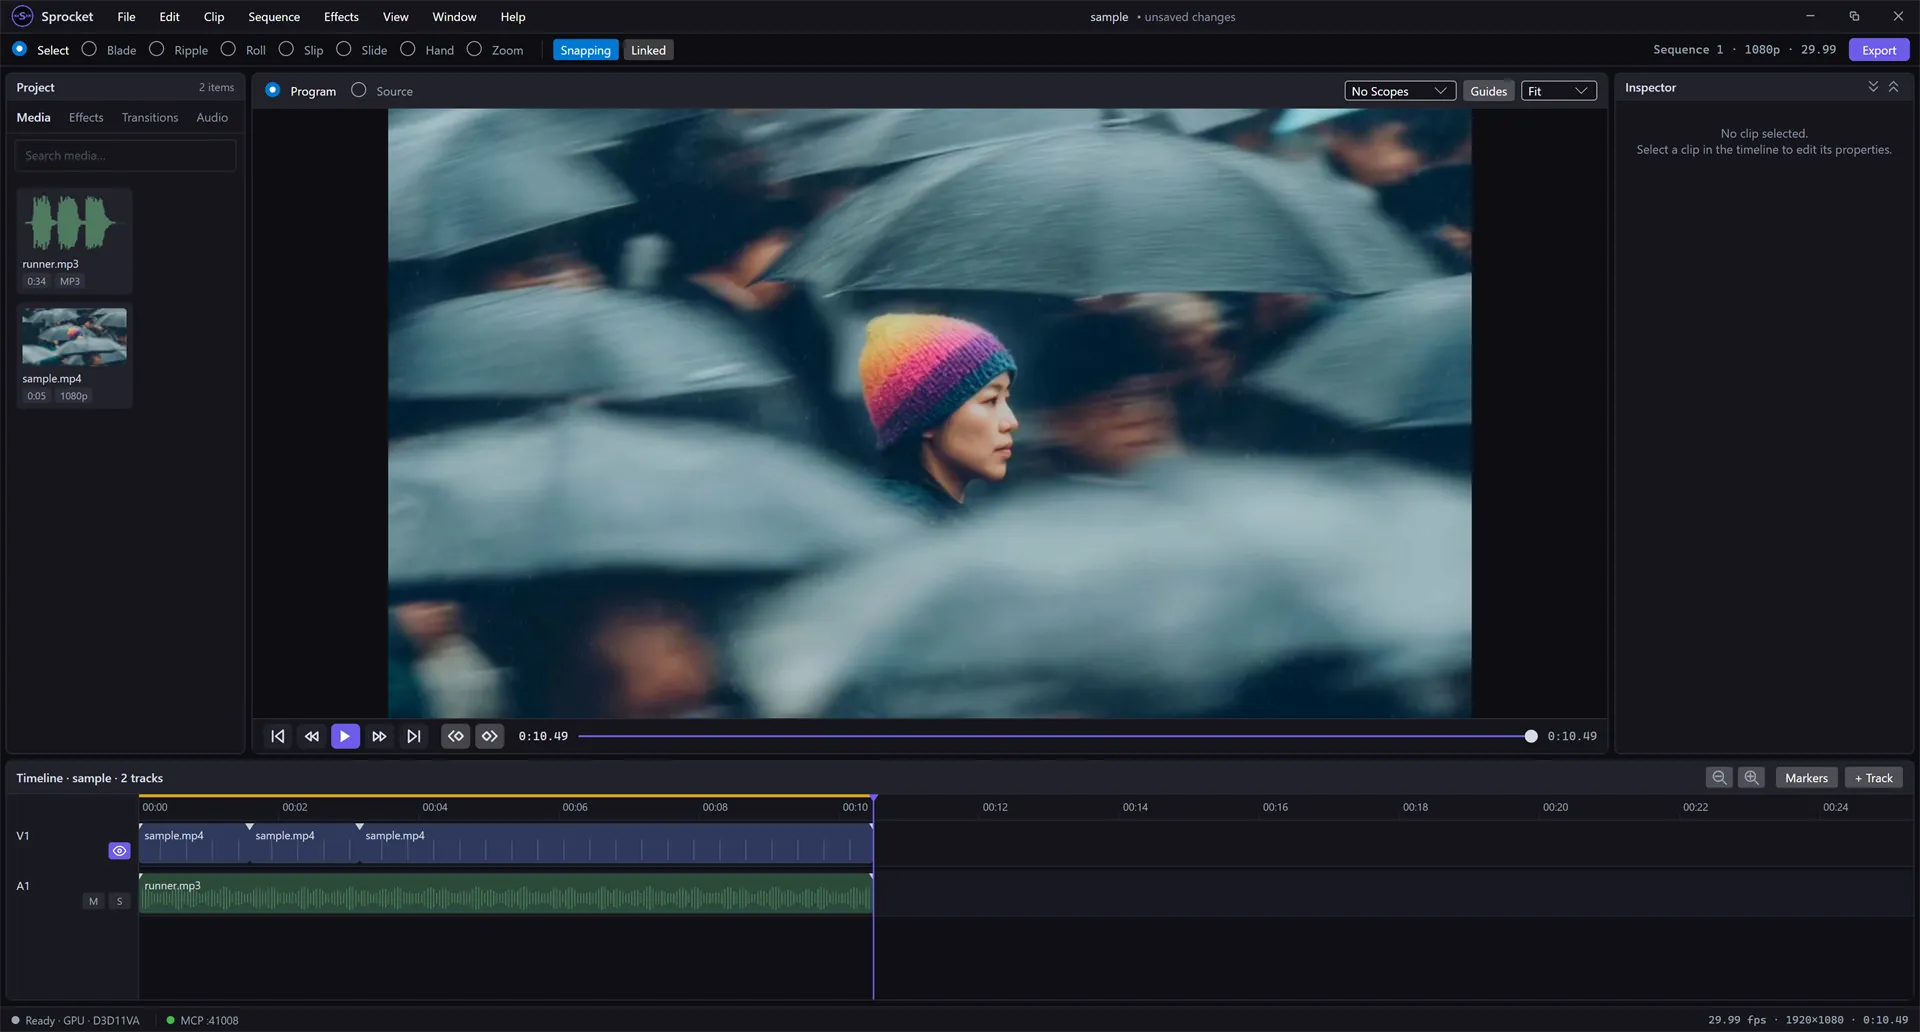
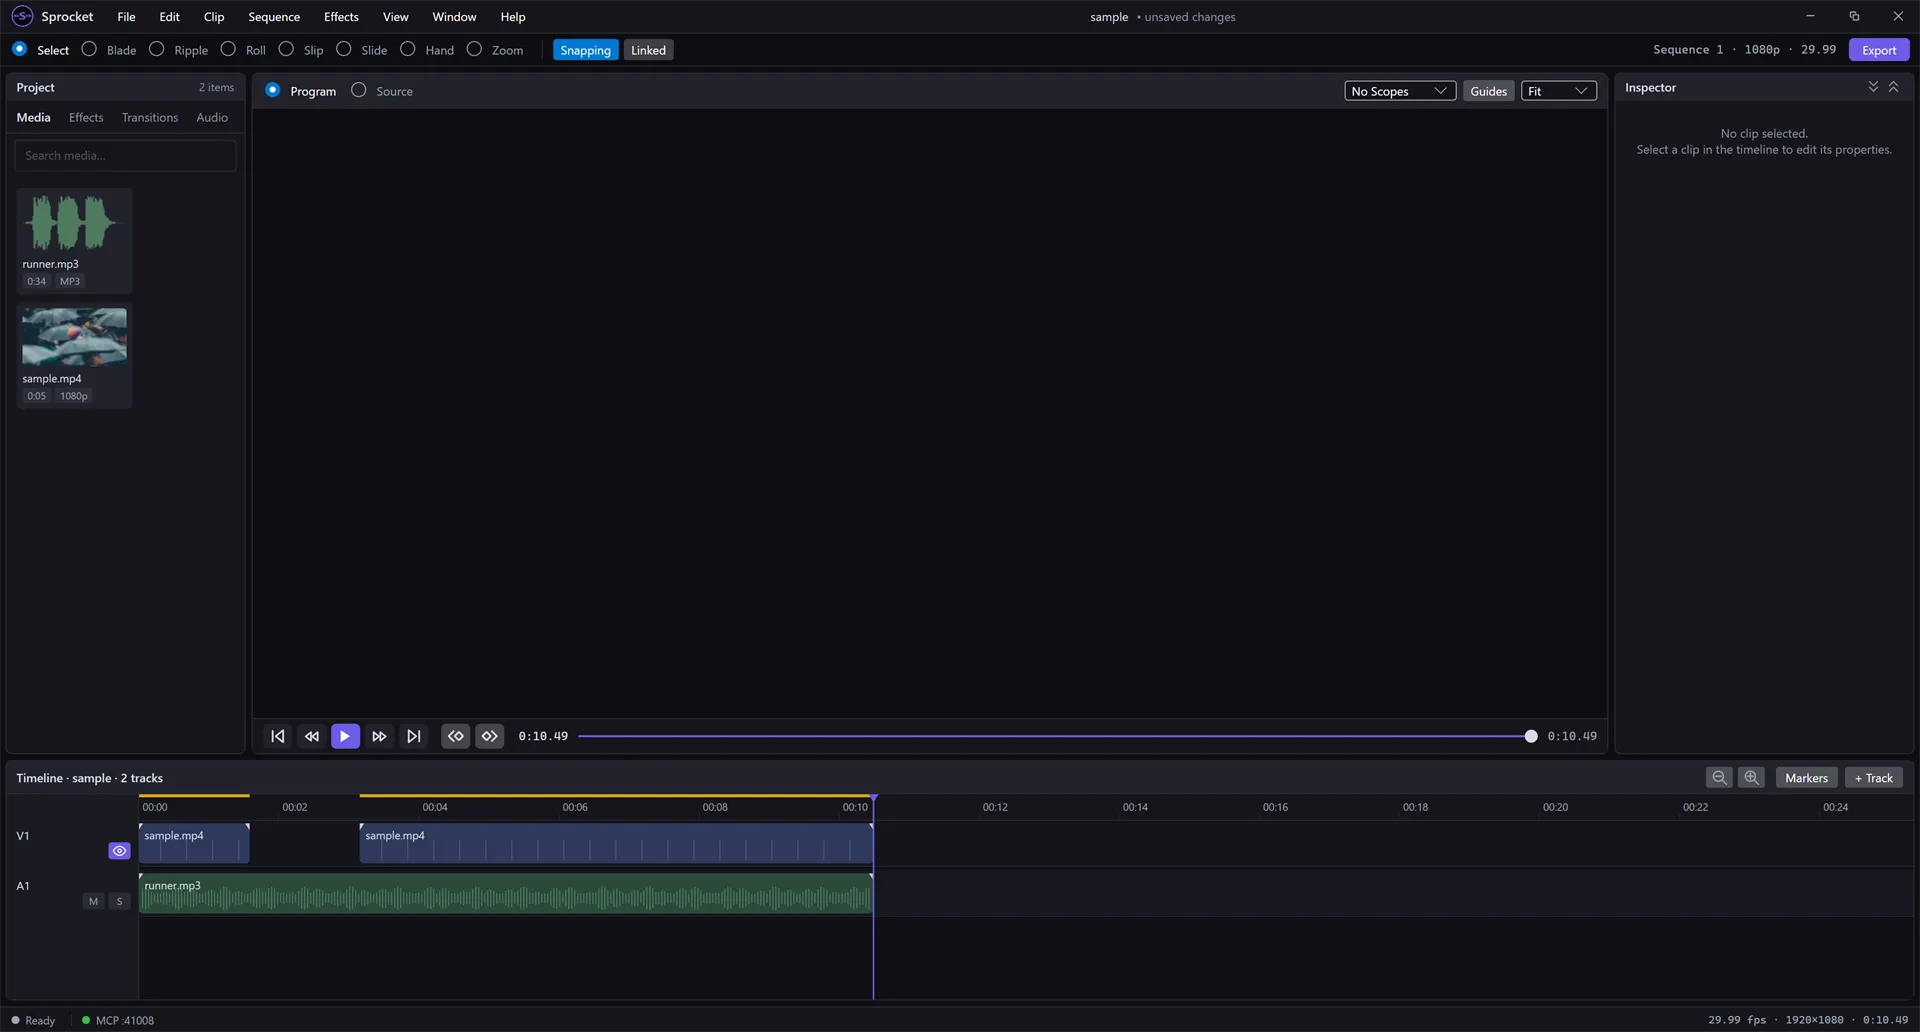
Delete (Delete) removes the selected clip and leaves a gap where it was.
The clips after it stay put:
Ripple Delete (Shift+Delete) removes the clip and slides everything
after it back to close the gap, so your video gets shorter with no empty space:
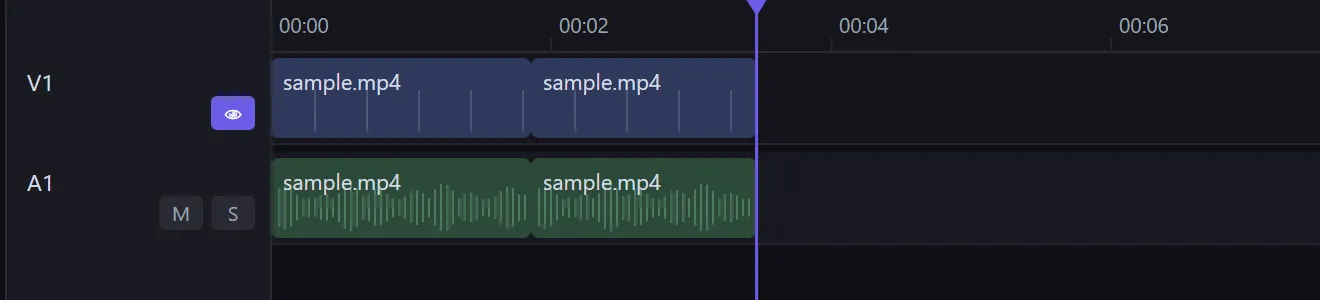
Both are also in the Edit menu.
Cut, copy, and paste
Section titled “Cut, copy, and paste”Clips go on the clipboard like text does, so you can lift a clip from one spot and drop it in another:
- Cut (
Ctrl+X) removes the selected clip(s) and puts them on the clipboard. - Copy (
Ctrl+C) copies without removing. - Paste (
Ctrl+V) drops them back onto the timeline.
The key thing to know is where a paste lands: at the playhead. Position the playhead where you want the clip to start, then paste. If you copied several clips at once, the earliest one lands at the playhead and the rest keep their spacing relative to it — so you can copy a whole arranged section and drop it elsewhere intact, as one undo step. Pasted clips are independent copies, so editing a copy never changes the original.
Splitting a clip at the playhead
Section titled “Splitting a clip at the playhead”Besides the Blade tool, you can split the selected clip right where the
playhead sits: choose Clip ▸ Split at Playhead (Ctrl+K). This is handy
when the playhead is already parked on the exact frame — you don’t have to aim
the Blade. If the clip has linked audio, its companion splits at the same point.
Duplicating a clip
Section titled “Duplicating a clip”Clip ▸ Duplicate makes a copy of the selected clip and places it right after the original on the same track. It’s a quick way to repeat a shot without going through copy-and-paste. Linked video and audio duplicate together as a fresh linked pair.
Turning a clip off without deleting it
Section titled “Turning a clip off without deleting it”Sometimes you want to silence or hide a clip without removing it — to try
your edit without a shot, or to mute one clip while keeping the rest of the
track. Select it and choose Clip ▸ Enable (Shift+E) to toggle it off.
A disabled clip stays in place but plays nothing — no picture, no sound — and is drawn dimmed on the timeline so you can see it’s off. Toggle Enable again to switch it back on. (The menu item shows a checkmark when the clip is enabled.)
The right-click menu
Section titled “The right-click menu”Everything above — and the speed, frame-hold, and other clip commands later in this guide — is also a right-click away. Right-click a clip to open a menu of the actions that apply to it:
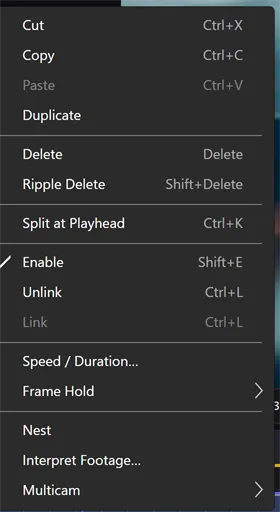
The menu is shaped to the clip you clicked. A video clip adds the Frame Hold commands, Interpret Footage, and Multicam; an audio clip adds Normalize Audio. It’s often faster than reaching for the menu bar, because it only lists what’s relevant to that clip.
Fading a clip in or out
Section titled “Fading a clip in or out”You can fade a clip right on the timeline, without adding an effect. Select a clip (with the Select tool) and you’ll see a small triangle handle in each of its top corners. Drag the left handle inward to fade the clip in, and the right handle inward to fade it out — the further you drag, the longer the fade:

There’s also a horizontal level line running across the top of the clip.
Drag it up or down to set the clip’s overall opacity (for video) or volume (for
audio). Ctrl-click the line to add a point, so you can shape the level up and
down across the clip rather than setting one flat level.
Tip: These on-clip fades are the quick, visual way to fade. For a fade with an exact duration you can type in, or an audio-only fade, use the Fade effect instead — see Adjust the audio.
Changing a clip’s speed
Section titled “Changing a clip’s speed”Select a clip and choose Clip ▸ Speed / Duration… to play it back faster or slower. Type a percentage or click one of the presets, then Apply:
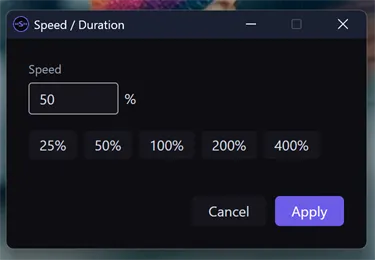
- Below 100% slows the clip down — 50% plays at half speed.
- Above 100% speeds it up — 200% plays at double speed.
Changing the speed changes how long the clip takes on the timeline — the footage itself doesn’t change, only how fast it plays. Speeding a clip up shortens it; slowing it down lengthens it. The Inspector’s Duration row updates to match:
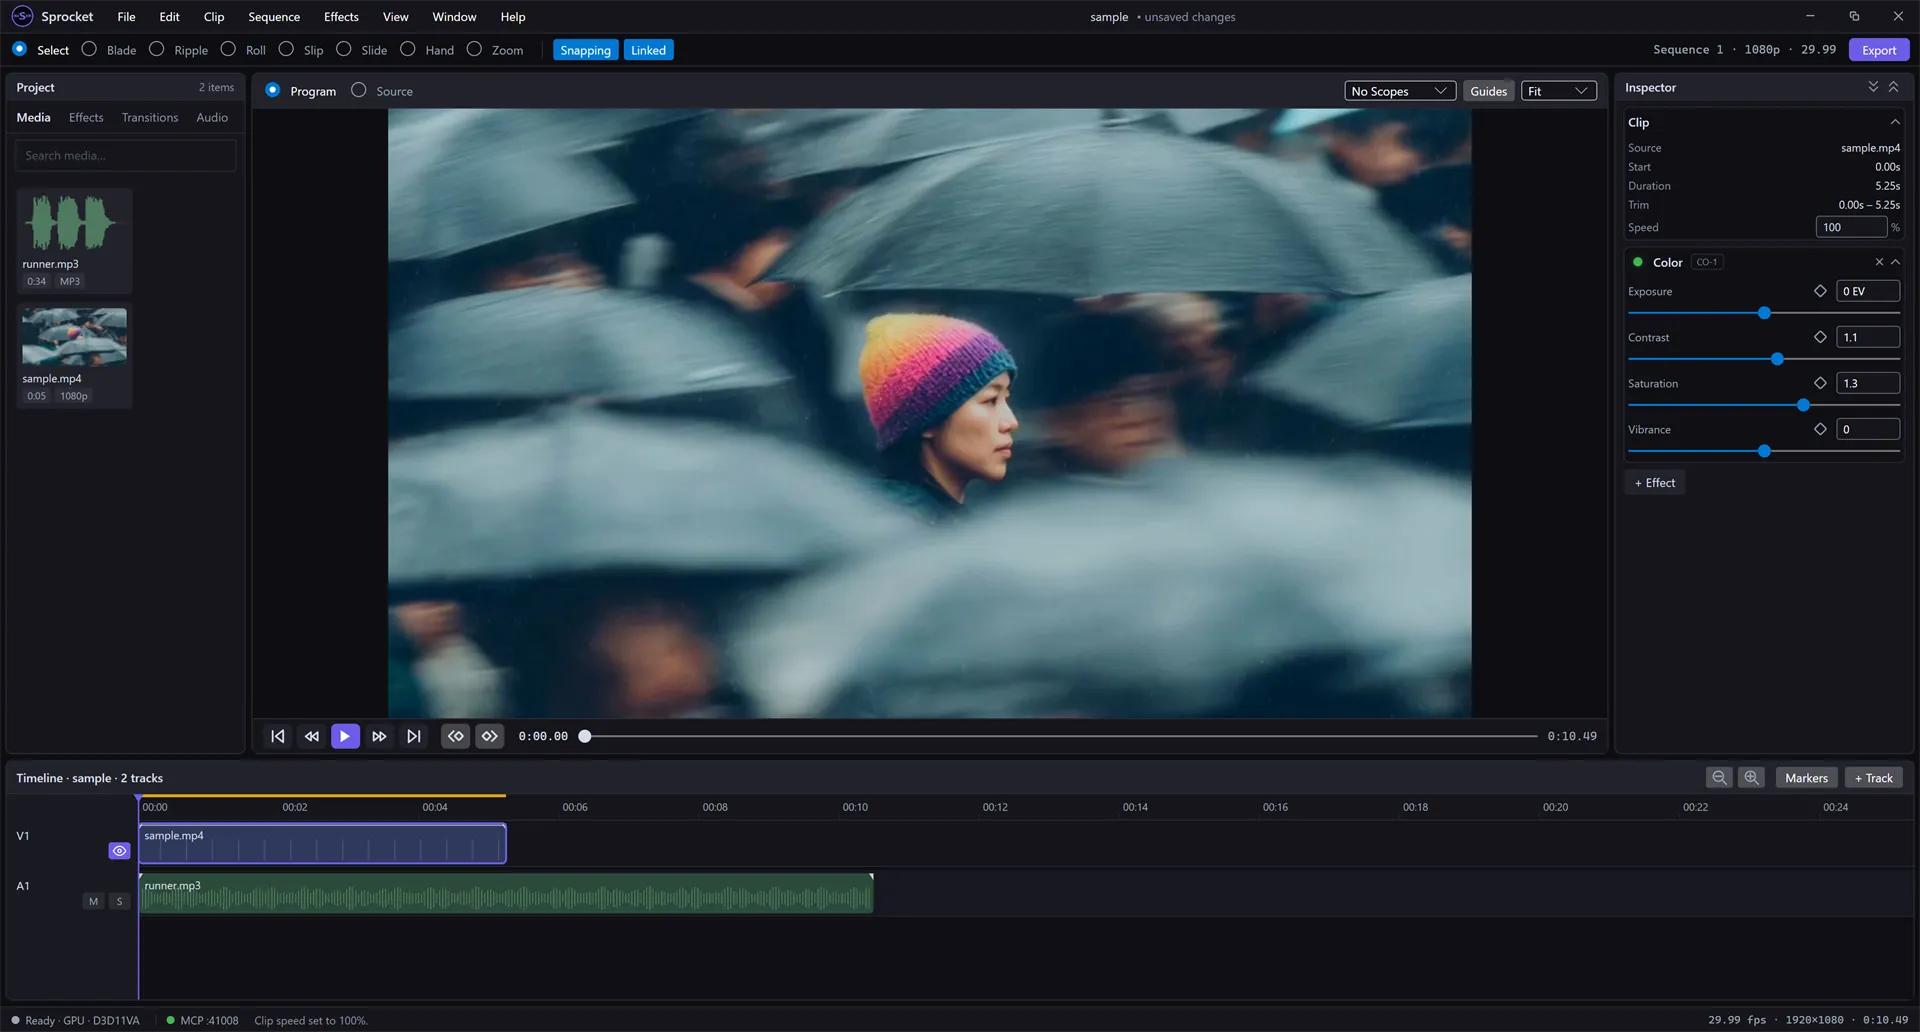
Tip: You can also type a new percentage straight into the Speed row in the Inspector — no need to open the dialog for a quick change.
If the clip has linked audio, its companion clip speeds up or slows down with it, so picture and sound stay in sync.
Freezing a frame (frame hold)
Section titled “Freezing a frame (frame hold)”Sometimes you want the video to pause on one frame — a freeze-frame ending, a beat before a title comes up, holding on a reaction shot — without leaving a gap or shortening anything else on the timeline. Sprocket calls this a frame hold, and it lives on the Clip menu, right below Speed / Duration:
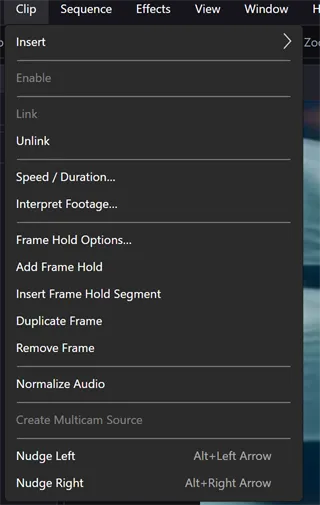
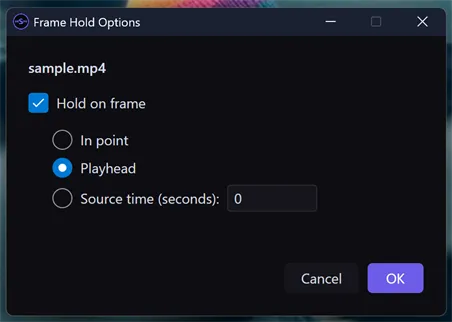
Frame Hold Options… freezes the whole selected clip on one frame — the frame under the playhead by default, or its in point, or an exact source time you type in:
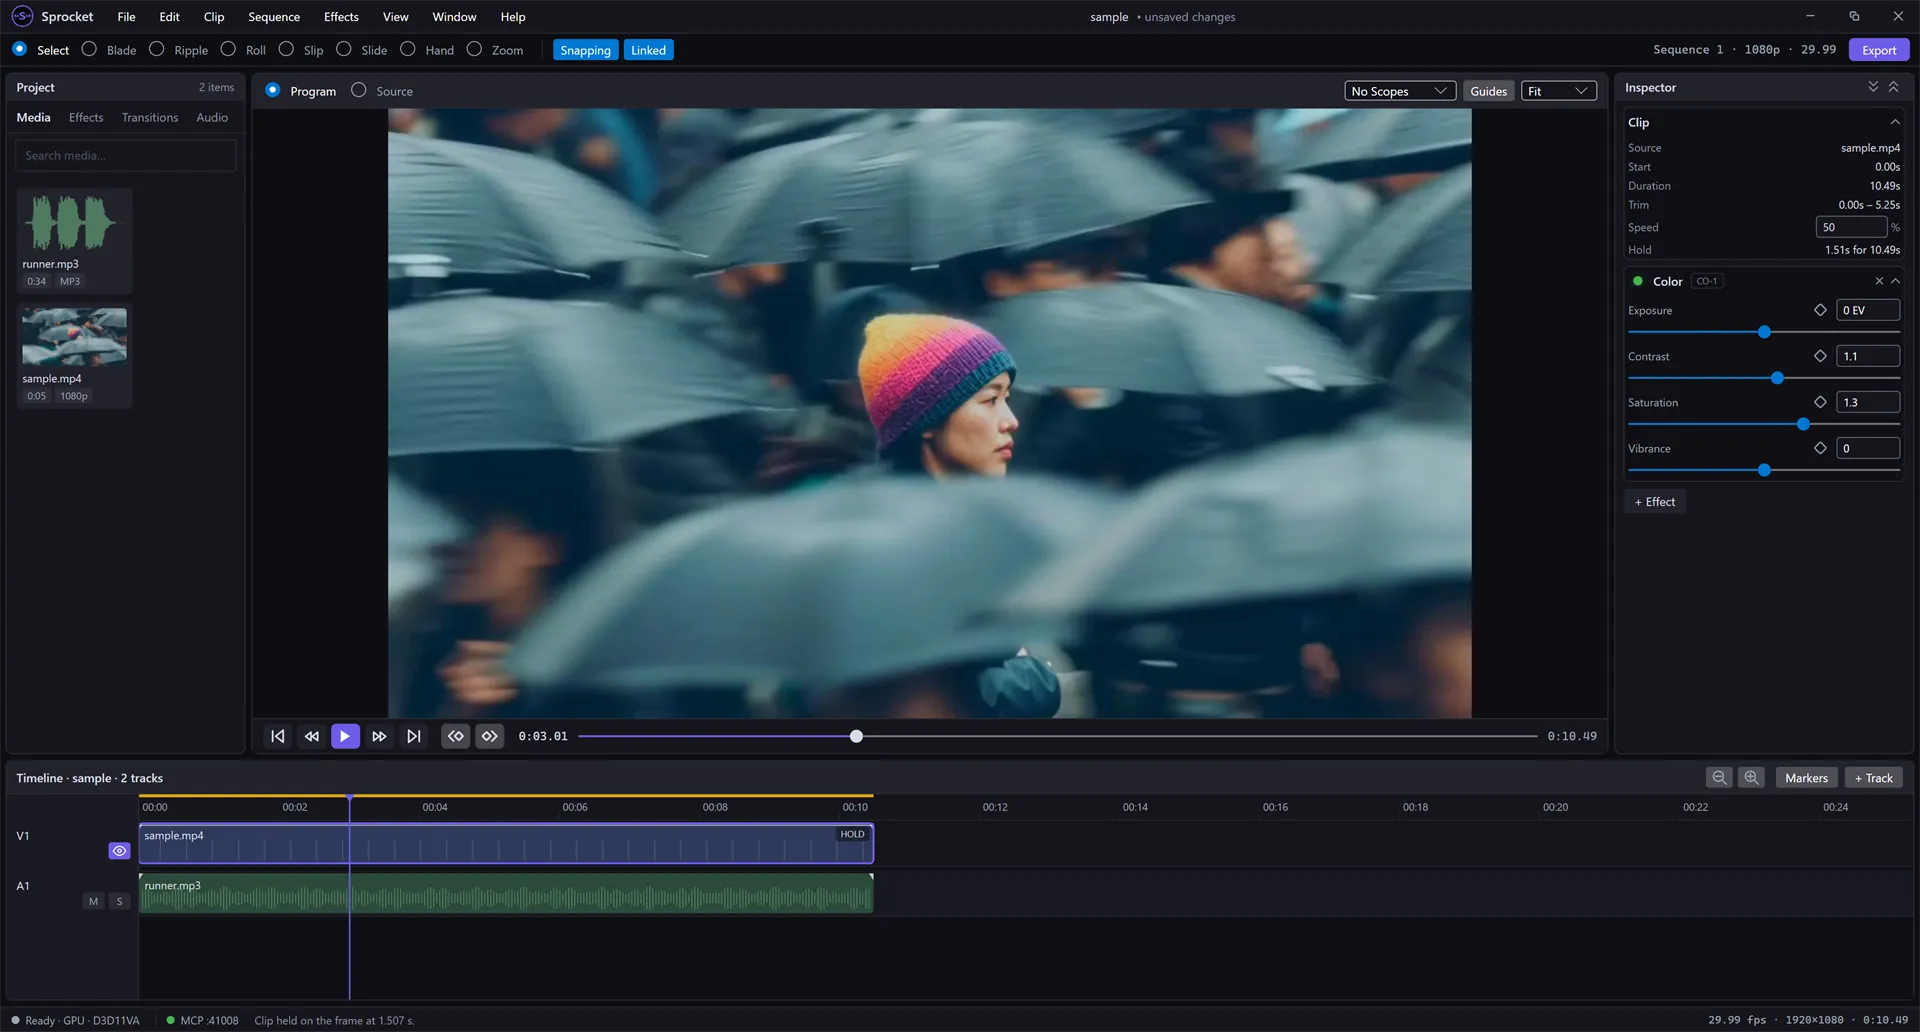
The clip’s length on the timeline doesn’t change — only what’s playing during it. Once applied, a HOLD badge appears on the clip and the Inspector’s Hold row shows the frozen frame and how long the hold lasts:
To release a hold, reopen Frame Hold Options…, clear the Hold on frame checkbox, and click OK.
Two related commands sit just below it on the same menu:
- Add Frame Hold splits the clip at the playhead and freezes only the second half on that frame — for holding on the last frame of a shot without affecting the part before the split.
- Insert Frame Hold Segment inserts a new, separate 2-second freeze of the playhead frame into the clip and pushes everything after it later — for adding a deliberate pause in the middle of a shot.
Tip: Frame hold only applies to video clips — it’s not available for audio.
Duplicate or remove a single frame (stop motion)
Section titled “Duplicate or remove a single frame (stop motion)”The last two commands in the frame-hold group work one frame at a time. They’re made for stop-motion-style work — repeating each frame so the footage plays “on twos” — and for micro-timing: adding or trimming a single frame so a cut lands exactly on a beat.
Select the clip, put the playhead on the frame you want, then:
- Clip ▸ Duplicate Frame inserts a one-frame freeze of that frame immediately after it, and everything after it on the timeline moves one frame later. Repeat it to hold the frame longer — duplicating twice plays the frame three times.
- Clip ▸ Remove Frame deletes that frame’s slice of the clip and closes the gap, so everything after it moves one frame earlier.
These are tiny edits — at a normal zoom you won’t see anything change. Zoom far
in (Ctrl+=) and a duplicated frame shows up as its own miniature segment
wedged into the clip:

The inserted segment is a regular frame hold — select it and the Inspector’s Hold row shows which frame it repeats.
Each command is a single undo step (Ctrl+Z puts the frame back), and neither
is available on a clip that’s already frozen with a frame hold.
Tip: “One frame” means one frame of the clip’s original footage. On a slowed-down clip that frame plays for longer than one timeline frame, so the piece you add or remove is correspondingly longer too.
Getting around: Hand and Zoom
Section titled “Getting around: Hand and Zoom”These two tools change your view without changing your edit:
- Hand — drag to pan the timeline left and right when your project is longer than the window.
- Zoom — click the timeline to zoom in for frame-accurate work;
Alt-click to zoom back out.
You can also zoom without picking up a tool: press - / = (or Ctrl+- /
Ctrl+=), or use the – / + buttons at the top-right of the timeline.
Press Shift+Z to fit the whole project in view.
To move the playhead from cut to cut, press Up / Down to jump to the
previous / next edit point (a clip’s start or end) on the
targeted tracks; hold Shift to consider
every track.
Following the playhead
Section titled “Following the playhead”The timeline doesn’t stop at your last clip. Drag the playhead along the ruler
past the end of your content and it keeps going into the empty space beyond; if
you hold it at the right edge of the timeline, the view scrolls to take you
further out. Out there the preview shows black. Parking the playhead past the
end doesn’t make your video any longer, and exports still stop at the last
clip. Press End to jump back to the end of your content. (If you drag past
the end while playing, playback stops where you let go.)
While your video plays, the timeline scrolls to keep the playhead in view. To choose how, open View ▸ Playback Auto-Scroll:
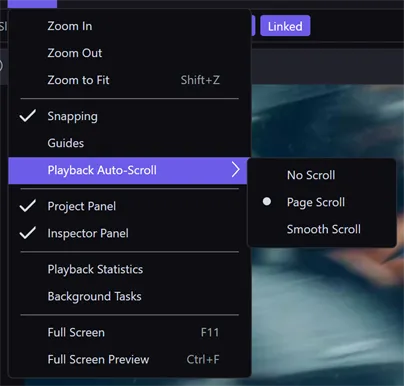
- No Scroll — the view stays where you left it, and the playhead can run off the edge.
- Page Scroll (the default) — when the playhead reaches the edge, the view jumps ahead a whole screen.
- Smooth Scroll — the view scrolls continuously, keeping the playhead in the center.
Sprocket remembers your choice the next time you open it. Whichever you pick,
jumping the playhead while stopped (for example with End, [ / ], or
Shift+M) always brings it into view, and the timeline never scrolls out from
under you while you’re scrubbing, panning, or dragging a clip.
Related
Section titled “Related”- Getting started — the basics of opening a project, selecting, splitting, effects, and exporting.
- Split a clip with the Blade
- Marks and markers — set an in/out range and drop markers.
- Three-point editing — cut a marked source range into the sequence with Insert and Overwrite.
- Titles, generators, and adjustment layers — add titles and other generated clips.
- Multicam and sequences — cut between angles, work with multiple timelines, and nest clips.
- Export your finished video