Audio levels & the mixer
Every audio track carries its own sound, and Sprocket gives you two ways to balance them. For quick changes there are per-track buttons right on the timeline — mute a track you don’t want to hear, solo one you want to focus on, and fade a clip’s audio in or out. For finer control there’s the mixer, where you set each track’s level and stereo position, watch loudness meters, match a delivery target, and stack audio effects on a whole track.
What’s in this guide
Section titled “What’s in this guide”- Adjust the audio
- Open the mixer
- Set a track’s gain, pan, mute, and solo
- The master strip
- Read the loudness meters
- Match a loudness target
- Add insert effects to a track, bus, or the master
- Where to go next
Adjust the audio
Section titled “Adjust the audio”Each audio track has two small buttons in its header on the left of the timeline:
- M — mute the track so you don’t hear it.
- S — solo the track so you hear only it and nothing else.
To fade audio in or out, select the audio clip and add the Fade effect from the Effects menu, the same way you added a picture effect. (Video tracks have their own toggle — the eye icon — to hide or show a track’s picture.)
Open the mixer
Section titled “Open the mixer”The mixer lives in the Project panel on the left. Click its Audio tab and the panel switches to the mixer: a master section at the top, then one strip for each audio track, and a Sequence Bus strip at the bottom.
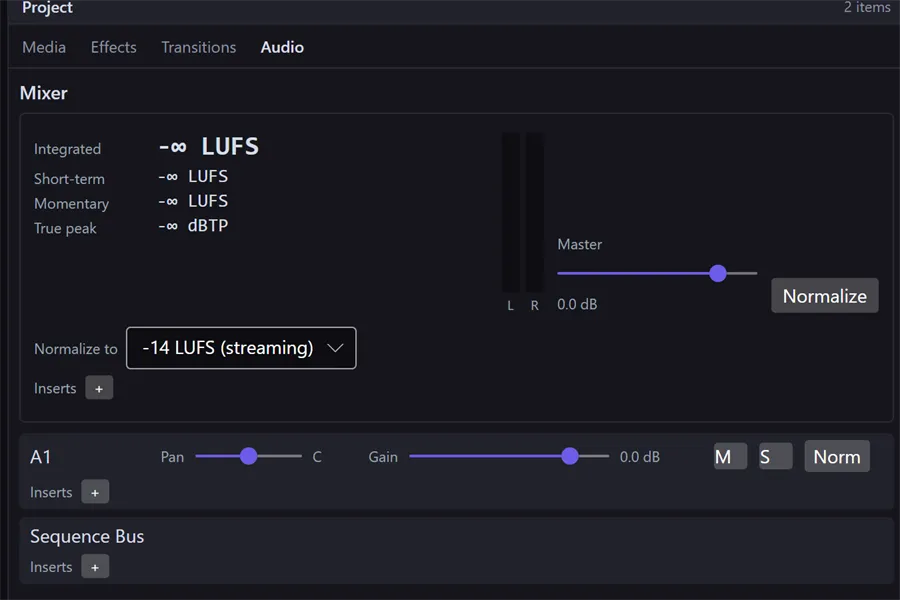
Tip: The mixer strips are wider than the Project panel’s default size. If the gain fader or the M / S / Norm buttons are cut off, drag the panel’s right edge to make it wider.
Set a track’s gain, pan, mute, and solo
Section titled “Set a track’s gain, pan, mute, and solo”Each audio track gets its own strip, labeled with the track’s name (A1, A2, and so on). The strip has:
- Pan — a slider that places the track in the stereo field. Left of center is the left speaker, right of center the right; the readout shows C for dead center, or L/R with a number (for example L30) as you move off center.
- Gain — a fader that sets the track’s volume, from −60 dB up to +12 dB. The readout shows the current level, with 0.0 dB meaning the track plays at its original volume.
- M and S — the same mute and solo you’ll find on the timeline track header.
- Norm — normalizes this track to your chosen loudness target (see Match a loudness target).
Drag a slider or fader to change it; the change applies to the whole track.
The master strip
Section titled “The master strip”The section at the top of the mixer is the master — the final output that everything mixes down to. Its Master fader sets the overall volume of your whole project (again −60 dB to +12 dB, with 0.0 dB as the starting point). To its left, two meters labeled L and R show the live left and right output levels while you play, filling from green up through amber to red as the sound gets louder.
Read the loudness meters
Section titled “Read the loudness meters”The numbers at the top of the master section measure loudness — how loud your mix actually sounds, not just its peak level. They update as you play:
- Integrated — the average loudness over everything played so far. This is the number streaming and broadcast targets refer to.
- Short-term — loudness over roughly the last few seconds.
- Momentary — loudness right now.
- True peak — the highest sample-accurate peak, shown in dBTP. Keeping this a little below 0 avoids distortion on other people’s speakers.
The three loudness readings are shown in LUFS (Loudness Units Full Scale) — the standard scale platforms use. Before you play anything they read −∞, since there’s no sound to measure yet.
Tip: Most streaming platforms aim for around −14 LUFS integrated. Louder isn’t better — services turn overly loud uploads back down anyway.
Match a loudness target
Section titled “Match a loudness target”Rather than nudging faders by ear, you can have Sprocket set levels to hit a loudness target for you. First pick the target from the Normalize to dropdown in the master section:
- −14 LUFS (streaming) — the default; good for YouTube, most social video.
- −16 LUFS — a little quieter, common for podcasts.
- −23 LUFS (broadcast) — the EBU R128 broadcast standard.
Then normalize at whichever level you need:
- The whole mix — click Normalize in the master section.
- One track — click the Norm button on that track’s strip.
- One clip — select an audio clip, then choose Normalize Audio from the Clip menu (or right-click the clip). A message in the status bar confirms the target it hit and how much it changed the level.
Each normalize is a single step you can undo if you don’t like the result.
Add insert effects to a track, bus, or the master
Section titled “Add insert effects to a track, bus, or the master”Every strip has an Inserts row — a place to stack audio effects that process everything on that track (or bus, or the whole mix), rather than a single clip. This is where you’d put an equalizer to shape a whole voice track, or a compressor to even out a music bed.
To add one, click the + next to Inserts and pick an effect from the list. It appears as a row in the chain:

Each insert row has:
- A status dot on the left — green when the effect is active, grey when it’s bypassed. Click it to turn the effect off without removing it (its settings are kept).
- The effect name — click it to edit the effect’s settings in the Inspector.
- A ✕ on the right to remove the effect.
- Move Up / Move Down on the right-click menu to reorder the chain.
Inserts run in a fixed order through your mix: a track’s inserts process that track first, then the Sequence Bus inserts process the combined mix of all tracks, and finally the Master inserts process the final output. The Sequence Bus strip has no fader of its own — it’s there only to hold that middle stage of the chain.
When you click an insert’s name, the Inspector shows the whole chain with a heading that tells you where it sits — Track Inserts, Bus Inserts, or Master Inserts — followed by each effect’s settings, exactly like the controls for a clip effect. You can also add effects from here with the + Effect button at the bottom.
Tip: Insert effects (and the full audio-effect library) are covered in depth in Audio effects — what each one does and how to dial it in.
Where to go next
Section titled “Where to go next”- Audio effects — the full library of audio effects (EQ, compression, reverb, delay, and more), and how to apply them to a clip or a mixer insert.
- Fading a clip in or out — drag the fade handles right on the clip.
- Effects & the effect stack — how to add, adjust, and remove any effect, including Fade.