Getting started with Sprocket
Sprocket is a free video editor for Windows, macOS, and Linux. You arrange video and audio clips on a timeline, trim and rearrange them, adjust how they look and sound, and then export a finished movie file you can share.
Your edits are non-destructive — trimming, splitting, and adding effects never change your original video and audio files. You’re always free to change your mind.
This guide gets a real project on screen, takes you on a quick tour, and then walks through the most common tasks in the order you’ll usually do them.
System requirements
Section titled “System requirements”Sprocket runs on:
- Windows — Windows 10 (64-bit, version 1809 or later) or Windows 11, on x64 or ARM64.
- Linux — x64 (AppImage) or arm64 (portable zip).
- macOS — Apple Silicon or Intel.
Every download is self-contained: there is nothing else to install — no .NET runtime and no FFmpeg setup.
What’s in this guide
Section titled “What’s in this guide”- System requirements
- Open something to work with
- A quick tour of the main screen
- The most common tasks, in order
- Keyboard shortcuts worth knowing
- Where to go next
Open something to work with
Section titled “Open something to work with”When Sprocket starts, it opens an empty project. The quickest way to see the editor in action is to load the built-in sample:
- Open the File menu in the top-left.
- Choose Open Sample Project.
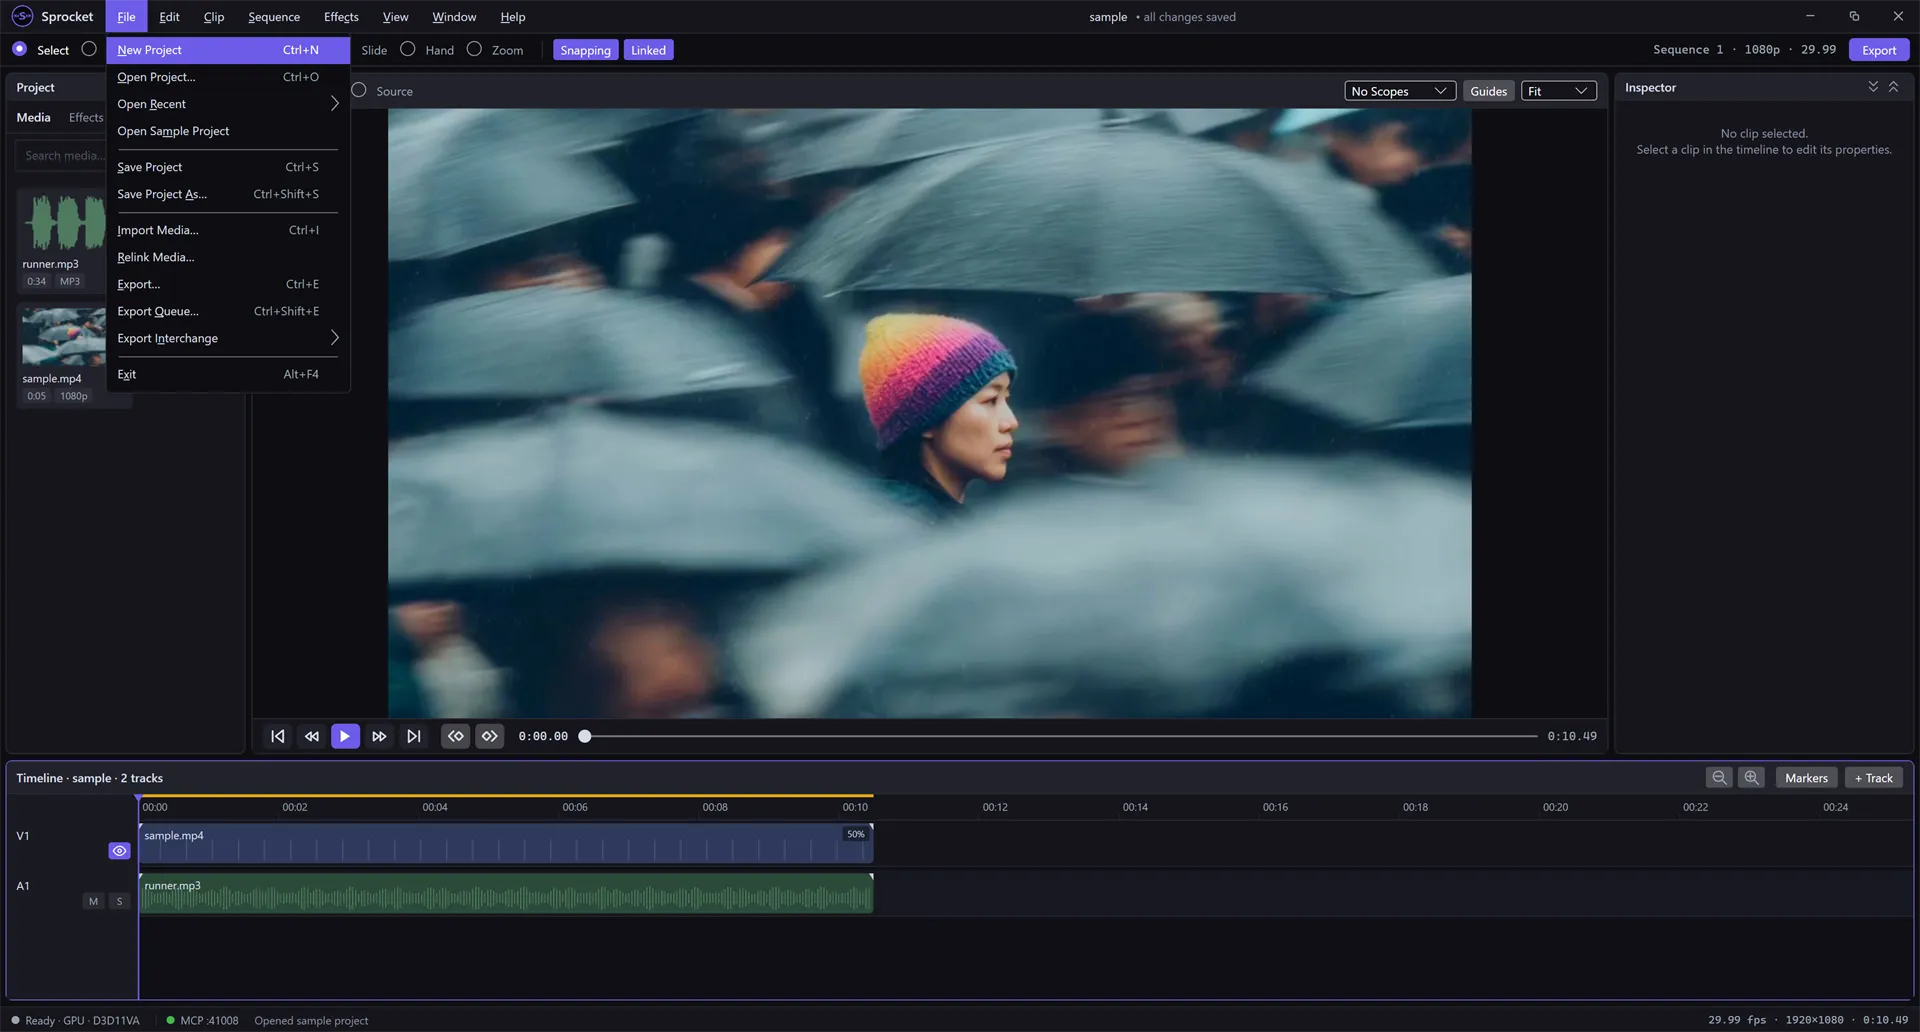
A short sample video and its audio appear on the timeline, ready to edit. The project name (sample) and a • all changes saved indicator show at the top of the window.
When you’re working on your own footage, you have a few other ways to get started from this same File menu:
- New Project (
Ctrl+N) — start from scratch with one video and one audio track. - Import Media… (
Ctrl+I) — bring your own video and audio files into the project. You can also drag files straight from your file browser onto the Project panel. - Open Project… (
Ctrl+O) — reopen a project you saved earlier.
Tip: Importing media only adds it to your project’s library — it doesn’t put it on the timeline yet. You’ll drag it onto a track when you’re ready to use it.
A quick tour of the main screen
Section titled “A quick tour of the main screen”Here’s the lay of the land. Every panel is resizable — drag the dividers between them to give yourself more room where you need it.

- Menu bar — all of Sprocket’s commands, grouped into File, Edit, Clip, Sequence, Effects, View, Window, and Help. The center shows your project’s name and whether your changes are saved; the window buttons are on the right.
- Toolbar — your editing tools on the left (Select, Blade, Ripple, Roll, Slip, Slide, Hand, and Zoom), the Snapping and Linked toggles next to them, and the Export button on the right. The label in between (for example, Sequence 1 · 1080p · 29.99) tells you the video size and frame rate you’re editing at.
- Project panel — the library of media in your project, with Media, Effects, Transitions, and Audio tabs and a search box at the top.
- Program monitor — a live preview of your finished video at the current point in time. Below it are the playback controls and a timecode readout. The Guides button overlays framing guides, the Fit menu sets how large the preview is drawn, and the Scopes menu next to it turns on waveform, vectorscope, and other monitoring overlays for color work. See Preview and monitors for all of these, plus the Source monitor and full-screen preview.
- Inspector — the properties of whichever clip you’ve selected. It stays empty (“No clip selected”) until you click a clip on the timeline.
- Timeline — your tracks stacked over time, with video tracks (V1) on top and audio tracks (A1) below. A ruler runs across the top and a vertical playhead marks the current point. The zoom buttons, Markers, and + Track controls sit at its top-right.
The thin strip along the very bottom is the status bar. It shows whether Sprocket is ready or playing on the left, an AI control (MCP) indicator next to it when that’s turned on, a running message in the middle (like “Opened sample project”), and live playback stats — frame rate, video size, and duration — on the right.
The most common tasks, in order
Section titled “The most common tasks, in order”1. Play and preview your video
Section titled “1. Play and preview your video”Use the controls under the Program monitor to watch your edit.
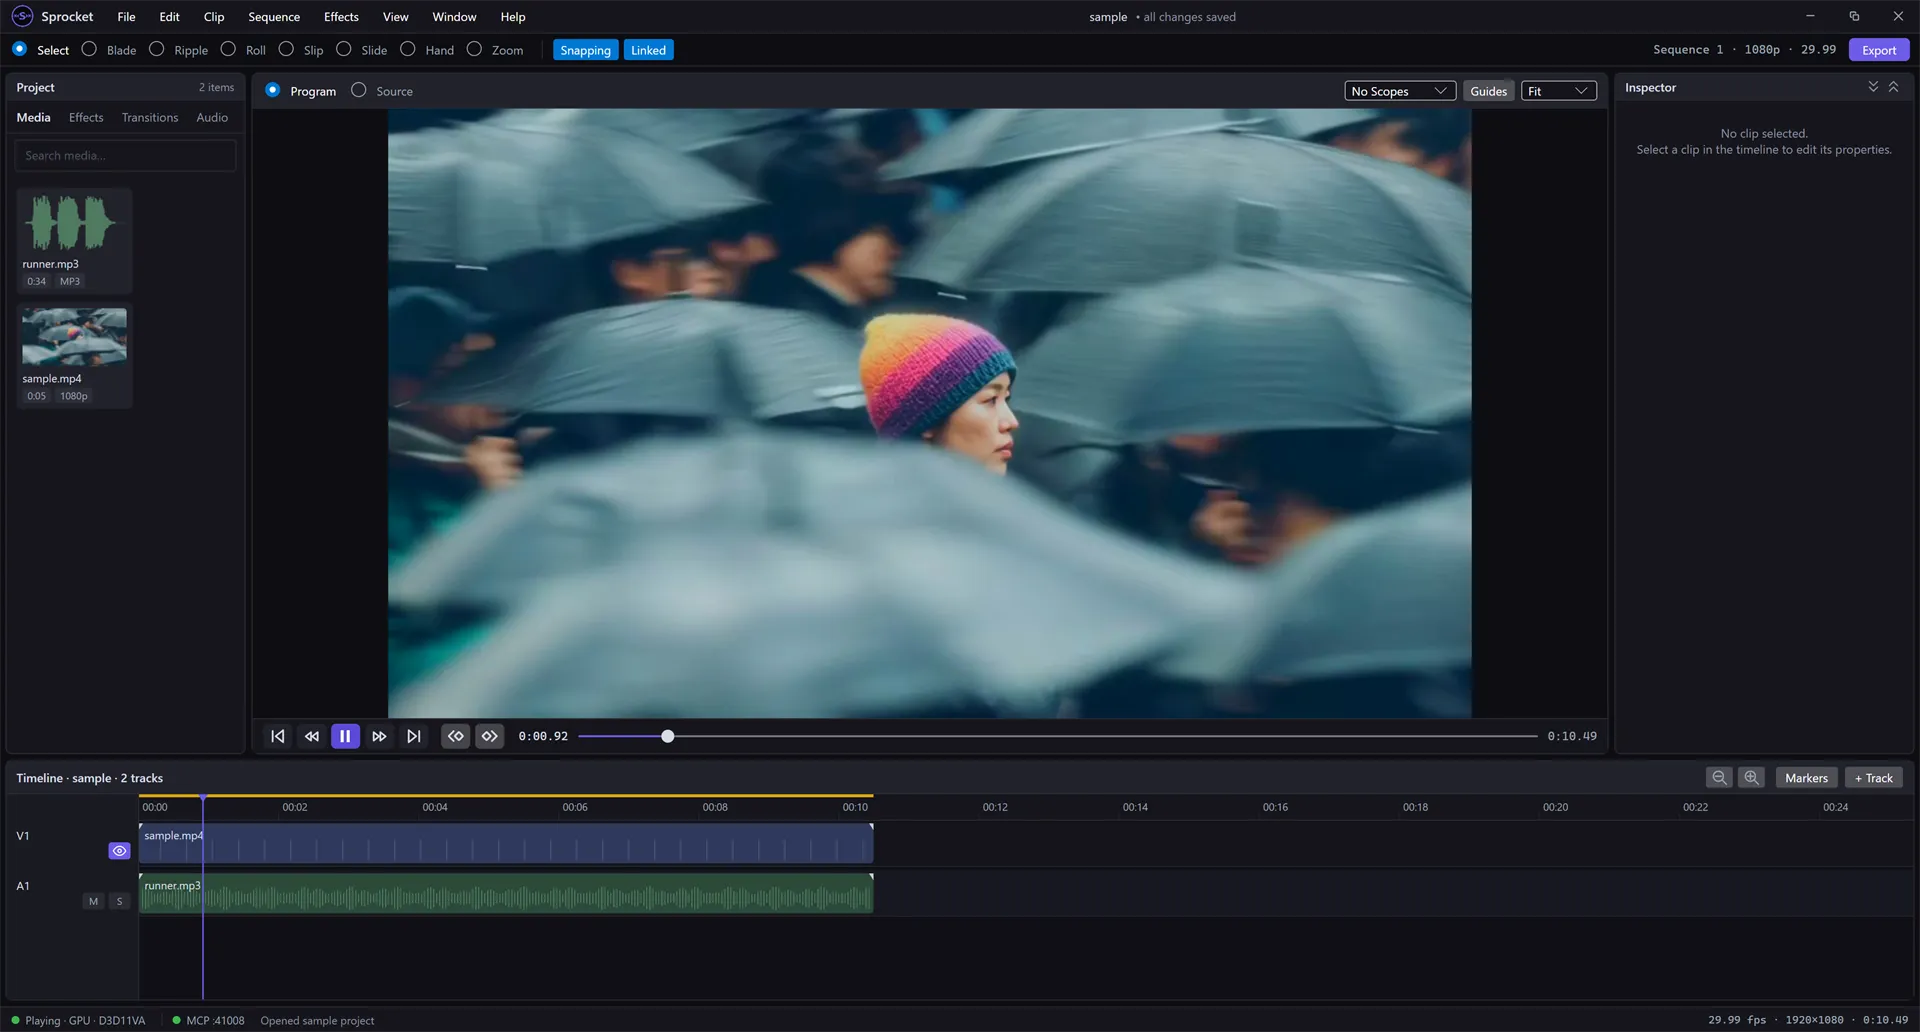
- Click the play button (or press the Space bar) to start and stop playback. It turns into a pause button while playing.
- The buttons on either side let you jump to the start, step back one
frame, step forward one frame, and jump to the end — or press
Home,←,→, andEnd. HoldShiftwith an arrow to step five frames. - Drag the slider (the scrubber) to jump to any moment. The timecode on the left shows where the playhead is; the one on the right is the total length.
To scrub through the timeline itself, drag along the ruler at the top of the
Timeline — the playhead follows your cursor and the preview updates as you
go. You can drag the playhead past the last clip into the empty space beyond
it; the preview just shows black there, and your video’s length doesn’t
change. Press End to jump back to the end of your last clip.
While your video plays, the timeline scrolls on its own to keep the playhead in view, a screen at a time. See Following the playhead to change that.
2. Zoom the timeline in and out
Section titled “2. Zoom the timeline in and out”Longer projects need more room. The quickest way is the - and = keys — press
- to zoom out and = to zoom in. You can also use the – and + buttons
at the top-right of the Timeline, or Ctrl+- and Ctrl+= (which keep
working while you are typing in a text field). To fit the whole project across
the width of the window, press Shift+Z.
3. Select a clip
Section titled “3. Select a clip”Most editing starts by telling Sprocket which clip you want to work on. With the Select tool active (the default), click a clip on the timeline. A colored border marks it as selected, and the Inspector on the right fills in with that clip’s details.
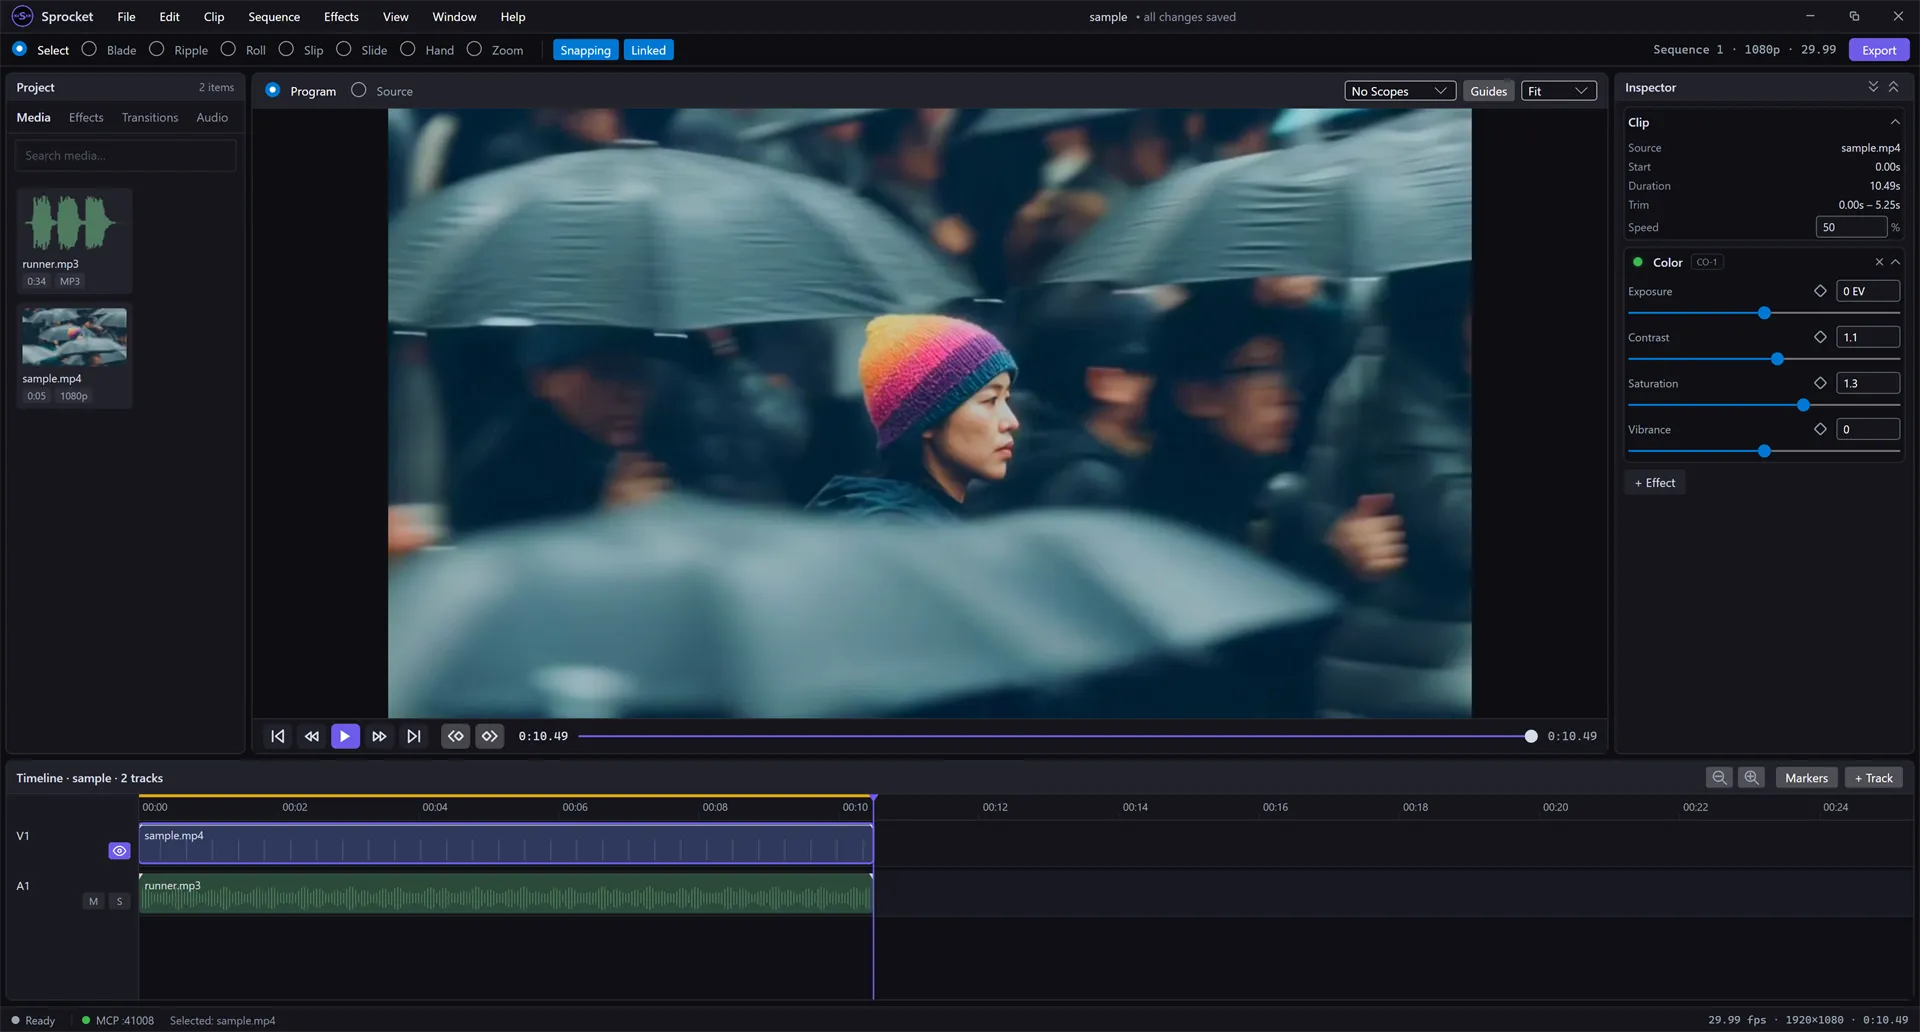
The Inspector’s top section shows the clip’s Source file, where it starts, its duration, and how much of the original media it uses (Trim). Everything below that is the clip’s effects, which you’ll adjust in a moment.
4. Trim a clip
Section titled “4. Trim a clip”Trimming shortens or lengthens a clip by moving its start or end point.
- Make sure the Select tool is chosen.
- Move your cursor to the left or right edge of a clip until the cursor changes to a trim handle.
- Drag the edge inward to hide part of the clip, or outward to reveal more of the original footage.
Because trimming is non-destructive, dragging an edge back out always brings your footage back — nothing is lost.
Tip: Leave Snapping turned on (in the toolbar) so clip edges click neatly into place against other clips and the playhead as you drag.
5. Split a clip with the Blade
Section titled “5. Split a clip with the Blade”The Blade tool cuts one clip into two so you can remove or rearrange a section.
- Move the playhead to where you want the cut.
- Click the Blade tool in the toolbar.
- Click the clip at the point you want to split it.
- Switch back to the Select tool to move or delete either piece.
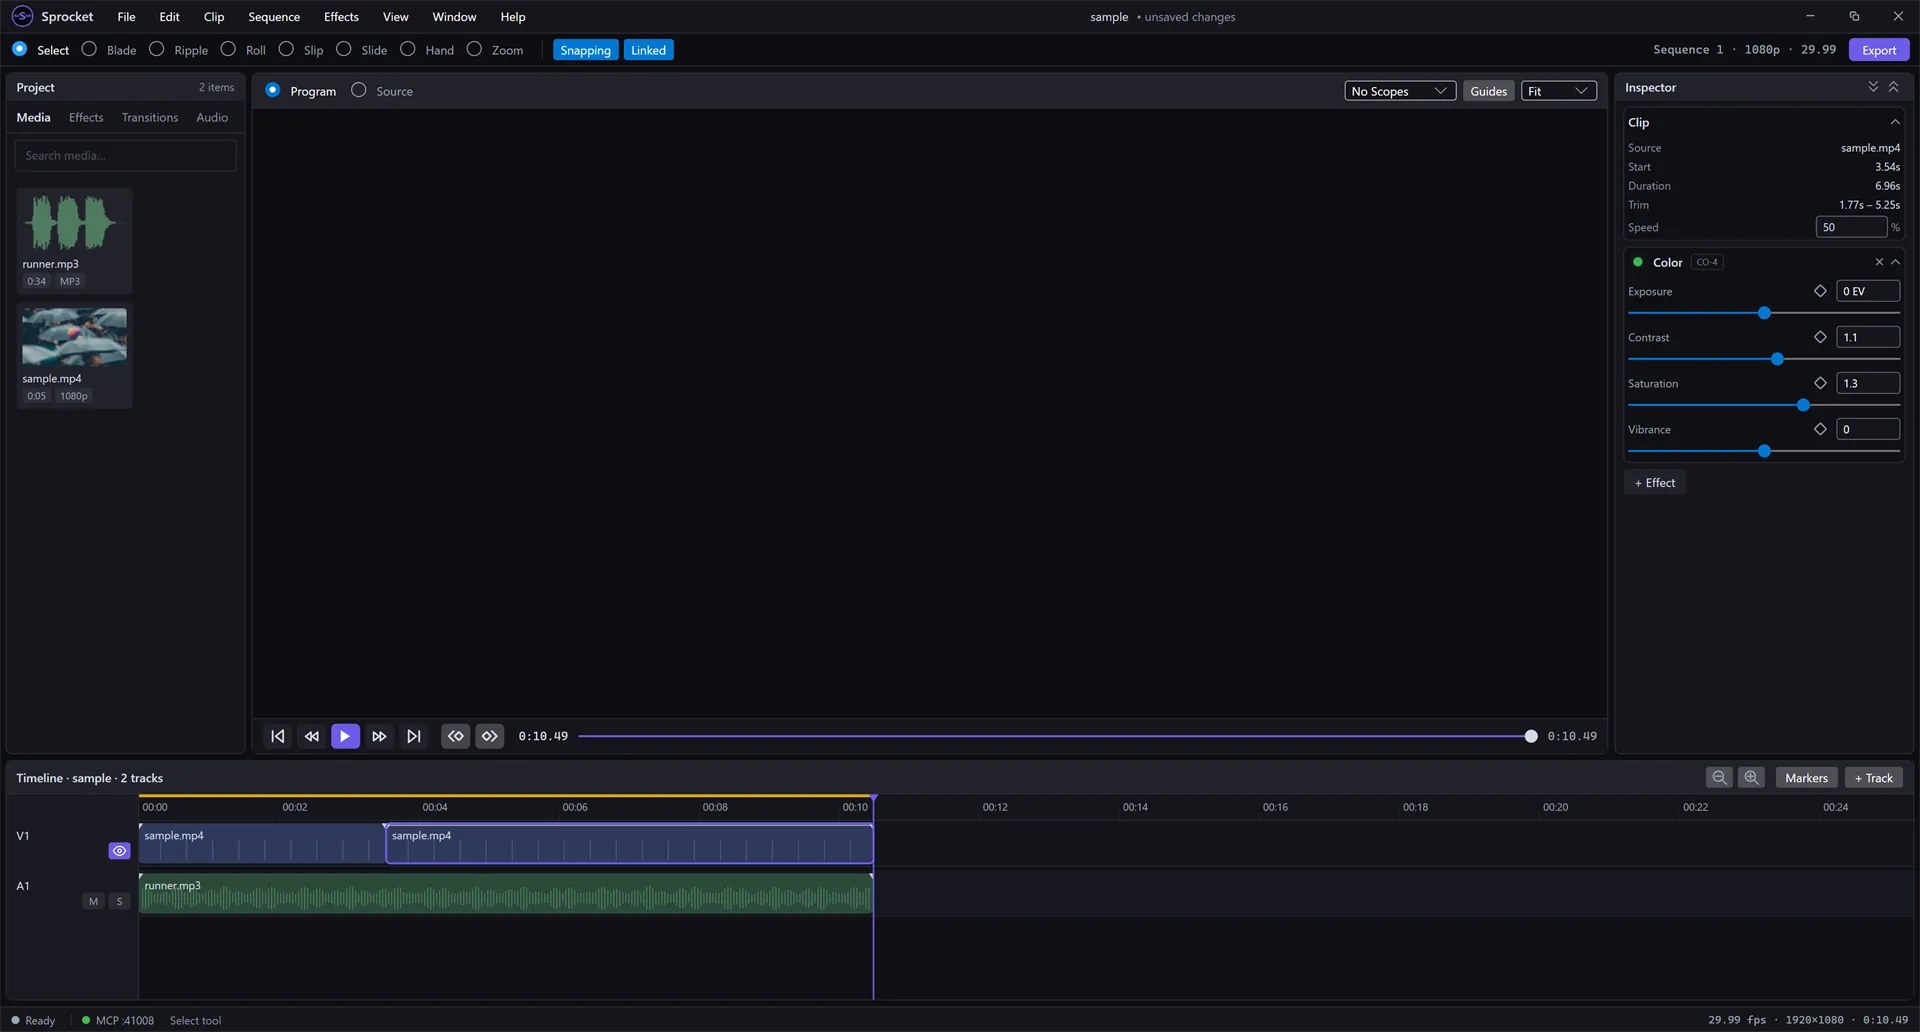
Blading only cuts the clip you click on. In the sample project, the music on A1 is its own separate clip, so it’s untouched by a cut on V1. When a clip’s video and audio do come from the same source (a video you recorded with its own sound), the Linked toggle keeps that pair moving and cutting together. Turn Linked off if you ever need to edit a clip’s picture and sound separately.
6. Move, delete, and close gaps
Section titled “6. Move, delete, and close gaps”- Move a clip: with the Select tool, drag a clip left or right along its track, or up and down to another track.
- Delete a clip: select it and press
Delete. This leaves a gap where the clip was. - Delete and close the gap: press
Shift+Delete(Ripple Delete) to remove the clip and slide everything after it back to fill the space.
You’ll find all of these in the Edit menu too, alongside the usual Cut, Copy, and Paste.
7. Change how a clip looks
Section titled “7. Change how a clip looks”Effects adjust a clip’s picture and sound — brightness, color, size, position, and fades. Select the clip, open the Effects menu, and choose an effect; it appears as a new section in the Inspector, where you drag a slider or type a value to adjust it. Transform, Color, Brightness, and Fade cover the everyday adjustments.
See Effects & the effect stack for the full set — adding, removing, and stacking effects — and Color grading for finer control over color.
8. Adjust the audio
Section titled “8. Adjust the audio”Each audio track has M (mute) and S (solo) buttons in its header at the left of the timeline. To fade a clip’s audio in or out, select it and add the Fade effect from the Effects menu, the same way you added a picture effect. (Video tracks have their own toggle — the eye icon — to hide or show a track’s picture.)
See Audio levels & the mixer for more.
9. Add a track
Section titled “9. Add a track”Need another layer of video or a second audio track? Click + Track at the top-right of the Timeline and choose Add Video Track or Add Audio Track.
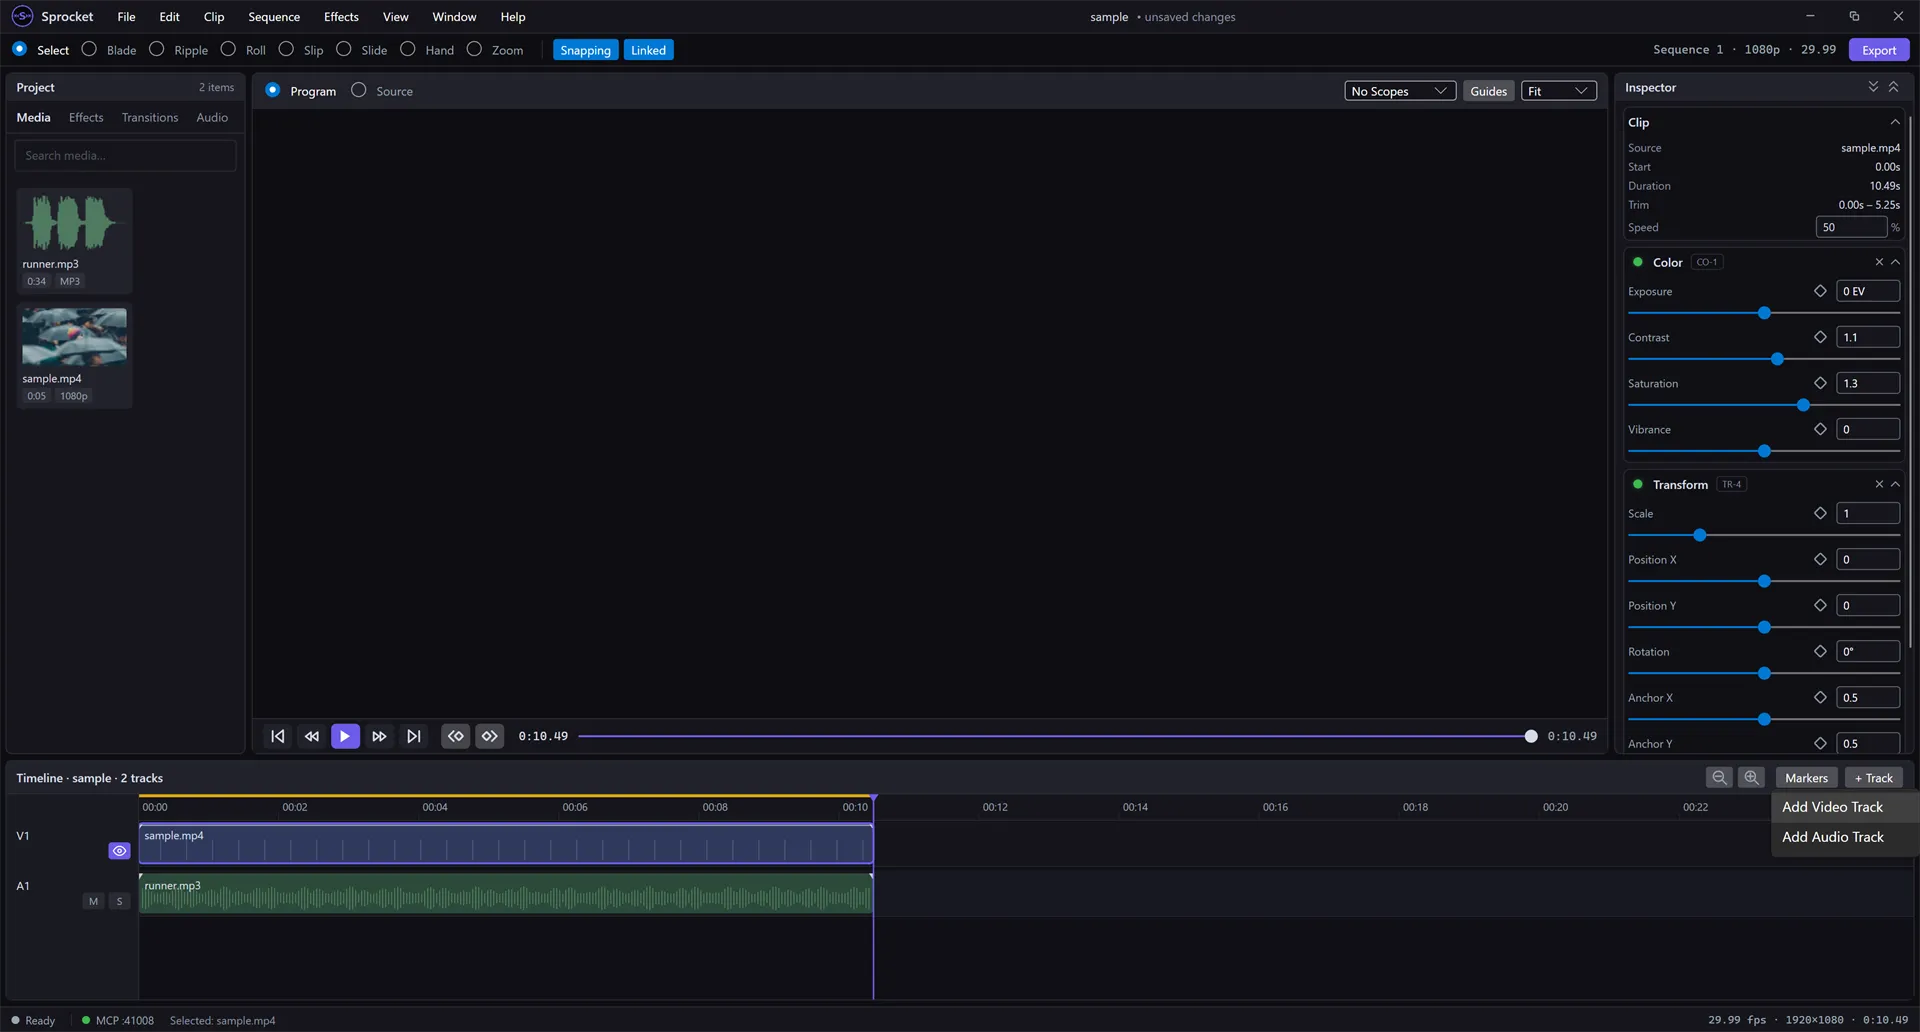
Higher video tracks appear in front — a clip on V2 shows over a clip on V1 at the same moment. Audio works differently: tracks don’t cover each other — every audio track plays at once and blends together into the final mix.
10. Undo and redo
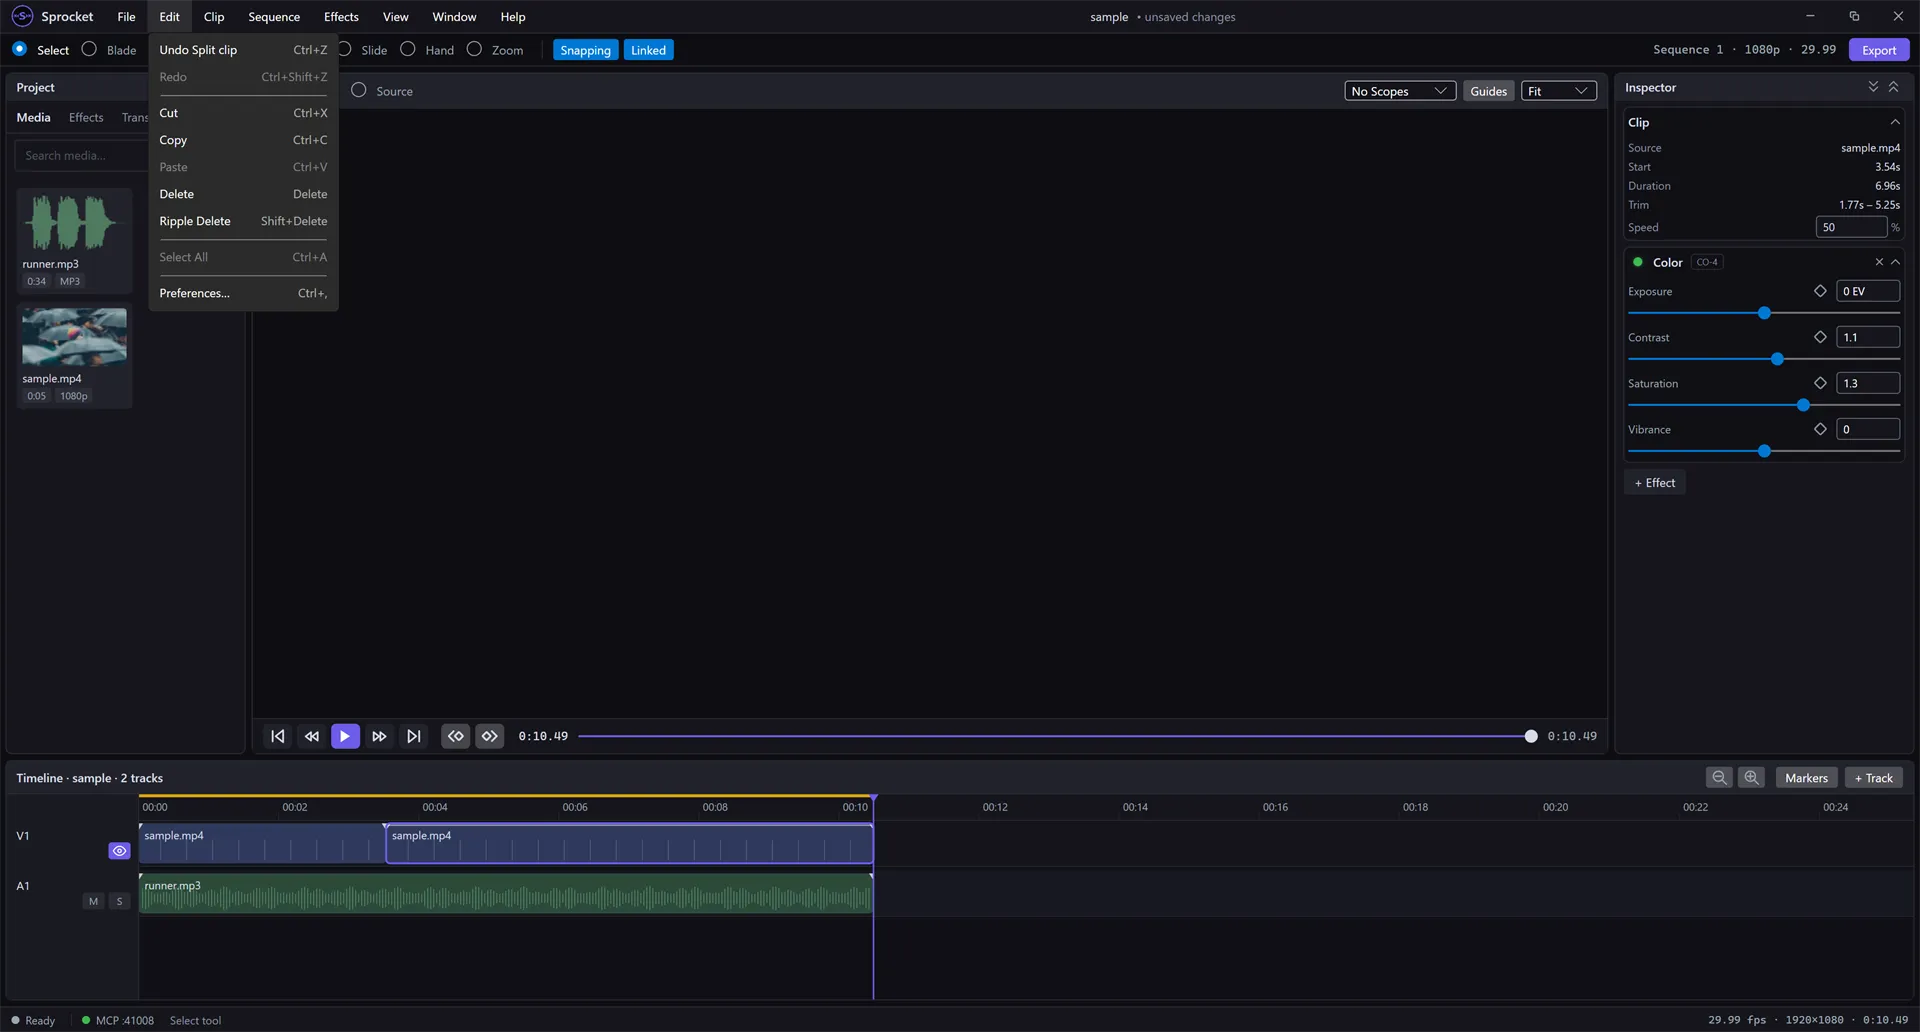
Section titled “10. Undo and redo”Made a mistake? Press Ctrl+Z to undo, or Ctrl+Shift+Z to redo. Sprocket
even names each step, so the Edit menu shows exactly what you’re about to
undo (for example, “Undo Split clip”).
11. Save your project
Section titled “11. Save your project”Save your work with File ▸ Save Project (Ctrl+S). The first time, Sprocket
asks where to put the project file. After that, Ctrl+S saves over it, and the
indicator at the top of the window switches from • unsaved changes back to
• all changes saved.
To keep a separate copy, use File ▸ Save Project As… (Ctrl+Shift+S).
A saved project remembers your timeline and edits, not the video itself — keep your original media files where they are. If you do move them, use File ▸ Relink Media… to point Sprocket at their new location.
Sprocket also autosaves in the background as you work, so an unexpected shutdown won’t cost you your edit. See Projects and saving for the full picture — Save As, autosave and crash recovery, and relinking moved media.
12. Export your finished video
Section titled “12. Export your finished video”Click the Export button in the top-right (or press Ctrl+E), choose your
settings in the Export Settings window, then click Export… and pick
where to save the file. The defaults produce a widely compatible MP4 file
(H.264 video, AAC audio) at your project’s size and frame rate.
See Exporting your video for the format, quality, burn-in, and preset options.
Keyboard shortcuts worth knowing
Section titled “Keyboard shortcuts worth knowing”| Shortcut | What it does |
|---|---|
Space | Play / pause |
Ctrl+Z / Ctrl+Shift+Z | Undo / redo |
Ctrl+X · Ctrl+C · Ctrl+V | Cut · copy · paste |
Delete / Shift+Delete | Delete / delete and close the gap |
- / = | Zoom the timeline out / in |
Shift+Z | Zoom the timeline to fit |
Ctrl+I | Import media |
Ctrl+S / Ctrl+Shift+S | Save / save as |
Ctrl+E | Export |
M | Add a marker at the playhead |
On macOS, use ⌘ where these show Ctrl. For the complete list — grouped by
task, with every platform difference — see the
keyboard shortcut reference.
Where to go next
Section titled “Where to go next”You now know enough to build a real edit from start to finish: bring in media, arrange and trim it on the timeline, adjust how it looks and sounds, and export the result.
From here:
- Editing on the timeline goes deeper on the toolbar — the Ripple, Roll, Slip, and Slide tools that each trim and shuffle clips in a different way, plus snapping, linked audio and video, and closing gaps.
- Try keyframing an effect for movement (the small diamond next to each Inspector setting), and use the Markers button to leave notes for yourself along the timeline.