Multicam and sequences
Once you’re comfortable editing a single timeline, Sprocket has three features for bigger projects: multicam lets you cut between several camera angles of the same moment, sequences let you keep more than one timeline in a project, and nesting collapses a group of clips into one so a complex edit stays manageable.
What’s in this guide
Section titled “What’s in this guide”- Cutting between camera angles (multicam)
- Working with more than one sequence
- Nesting clips into a sequence
Cutting between camera angles (multicam)
Section titled “Cutting between camera angles (multicam)”If you filmed the same scene with more than one camera, multicam lets you line the angles up once and then cut between them by pressing a number key — like switching cameras in a live broadcast.
Set it up: put each camera’s footage on its own video track, lined up in time (one track per angle), then choose Clip ▸ Create Multicam Source. This combines the angles into a single synced multicam clip. (The command is available once you have clips on at least two video tracks.)
Cut between angles: with the multicam clip selected, put the playhead where
you want to switch and press a number key — 1 for the first angle, 2 for the
second, and so on up to 9. Each press cuts to that angle at the playhead, so
playing through shows your footage cutting from camera to camera exactly where
you switched.
You can also change the angle from the Multicam section of the Inspector, which shows an Active angle row with one button per angle and the current one highlighted.
The clip’s label on the timeline shows both the source and the current angle, so you can always see which camera is live at a given point.
Working with more than one sequence
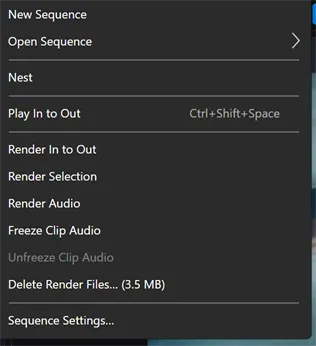
Section titled “Working with more than one sequence”A sequence is a single timeline. Most projects have just one, but you can keep several in the same project — a rough cut and a final cut, a main video and a separate intro, or one sequence per scene. The Sequence menu manages them:
-
New Sequence opens a dialog where you name the sequence and pick its frame size — widescreen, portrait, square, or a custom size — then creates a fresh, empty timeline with one video and one audio track. The frame rate and sample rate match your current sequence. Sprocket switches to it right away. See Aspect ratio and framing for the format presets.
-
Open Sequence lists every sequence in the project; pick one to switch to it. The sequence you’re currently in is ticked.
-
Sequence Settings… opens a dialog where you can rename the current sequence and change its frame size. The frame rate and audio sample rate are fixed, shown below the size for reference:
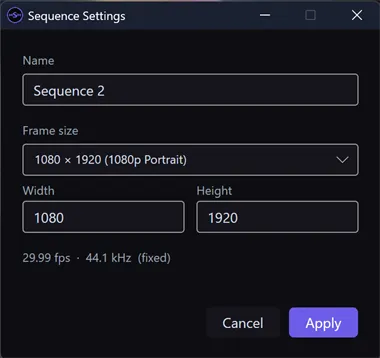
The name of the sequence you’re editing is shown near the top-right of the window, so you always know which one you’re in.
Nesting clips into a sequence
Section titled “Nesting clips into a sequence”Nesting takes a group of clips and tucks them into their own sequence, replacing them on your timeline with a single clip that stands in for the whole group. It’s the answer to a timeline that’s grown busy: collapse a finished section — a title sequence, a montage, a multi-layer composite — into one clip you can move and trim as a unit.
Select the clips you want to group (see Selecting several clips at once), then choose Sequence ▸ Nest. Sprocket moves those clips into a new sequence and drops a single nested-sequence clip in their place, drawn in teal and labelled with the new sequence’s name:

The nested clip behaves like any other clip on your timeline — move it, trim it, add effects to it. To edit what’s inside it, open its sequence from Sequence ▸ Open Sequence and edit those clips directly; the nested clip updates to match.
Tip: Nesting is one undo step. If the group wasn’t quite right,
Ctrl+Zputs the clips back exactly as they were.
Related
Section titled “Related”- Aspect ratio and framing — choose a sequence’s shape (vertical, square, widescreen) and control how clips fill the frame.
- Editing on the timeline — selecting, moving, and trimming clips, including the nested clips you create here.
- Marks and markers — set an in/out range in any sequence.