Exporting your video
Exporting turns your timeline into a single video file you can upload or share. Sprocket’s defaults produce a widely compatible file for most uses, and you can change the format, quality, and other settings whenever you need something specific.
What’s in this guide
Section titled “What’s in this guide”- Export your finished video
- Choose a format and codecs
- Export just part of the timeline
- Set the quality and encoding
- Set the resolution and frame rate
- Add burn-ins
- Add handles
- Choose how color is handled
- Add file details (metadata)
- Save and reuse presets
- While it exports
- Export the audio only
- Format reference
- Where to go next
Export your finished video
Section titled “Export your finished video”Exporting turns your timeline into a single video file you can upload or share.
- Click the Export button in the top-right (or press
Ctrl+E). - Choose your settings in the Export Settings window.
- Click Export…, pick where to save the file, and Sprocket renders it.
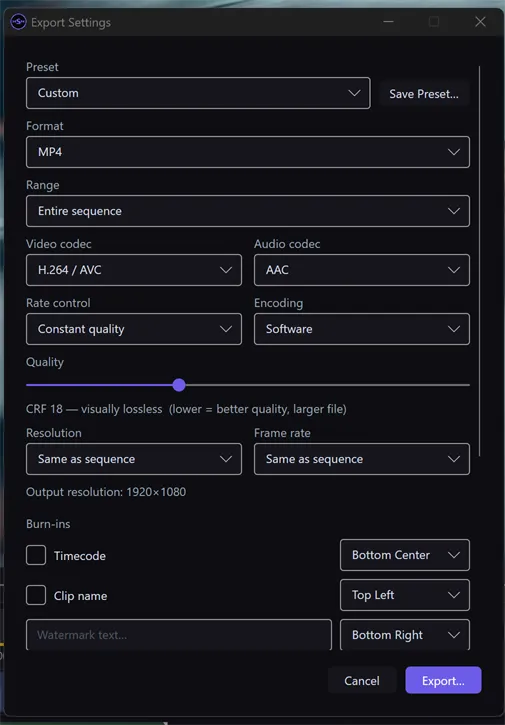
The defaults produce a widely compatible MP4 file (H.264 video, AAC audio) at your project’s size and frame rate — a good choice for most uses. If that’s all you need, you can click Export… right away and skip the rest of this guide.
Tip: If your timeline is empty, Sprocket tells you there’s nothing to export instead of opening the save dialog. Add at least one clip first.
When you need something specific, the sections below walk through every option in the window, top to bottom.
Choose a format and codecs
Section titled “Choose a format and codecs”The Format menu sets the type of file you get. MP4 is the default and plays almost everywhere; other choices suit specific needs:
- MP4 — the universal choice for uploading and sharing.
- QuickTime (MOV) — common on macOS and for ProRes delivery.
- Matroska (MKV) — flexible container that accepts the widest range of codecs.
- WebM — for the web, using the royalty-free VP9 or AV1 codecs.
- AVI and MPEG transport stream — for older or broadcast workflows.
Below the format are two menus, Video codec and Audio codec — the methods used to compress the picture and the sound. Sprocket only lists the codecs that are valid for the format you picked, so you can’t make a combination that won’t play. The most common pairing is H.264 / AVC video with AAC audio.
If you’re not sure which to choose, leave them on the defaults. For the full list of what each format supports, see Format reference.
Tip: The Format menu also has Audio only entries near the bottom for exporting sound without video — see Export the audio only.
Export just part of the timeline
Section titled “Export just part of the timeline”The Range menu controls how much of the timeline gets exported:
- Entire sequence — everything from start to end.
- In/Out range — only the portion between your in and out marks.
To export a section, first mark it on the timeline: move the playhead to the
start and press I to set the in point, then move to the end and press O to
set the out point. When marks are set, the Export Settings window opens with
In/Out range already selected. If you haven’t set any marks, this option
falls back to exporting the whole sequence.
See In and out marks for more on marking a range.
Set the quality and encoding
Section titled “Set the quality and encoding”Rate control decides how Sprocket trades file size against picture quality. It has two modes, and the control underneath changes to match:
- Constant quality — the default. The picture stays at a steady quality and the file size varies with the content. Drag the Quality slider to set it: lower numbers mean better quality and a larger file, and the readout under the slider translates the number into plain language (“visually lossless”, “good for web”, …). The default is a high-quality setting that suits most exports.
- Target bitrate — the file size is predictable and the picture quality varies instead. Type a rate in megabits per second into Target (Mbps), or leave it empty to use the recommended value shown in the box (it scales with your export resolution and frame rate). Max (Mbps) optionally caps short bursts above the target — handy when a platform enforces a hard limit; leave it empty for no cap.
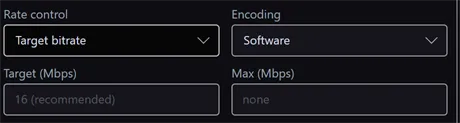
Stay with Constant quality unless the place you’re delivering to asks for a specific bitrate.
Tip: The Quality slider’s scale depends on the video codec you picked (H.264 and HEVC use 0–51; AV1 and VP9 use 0–63), so don’t memorize numbers — trust the plain-language readout under the slider.
Encoding chooses how the work is done:
- Software — the default. It’s the most compatible and produces the same result on every machine.
- Hardware (if available) — uses your computer’s graphics card to encode faster. If your machine doesn’t have a supported GPU encoder, Sprocket automatically falls back to software, so it’s always safe to try. Hardware encoding follows the same rate-control settings, so your quality or bitrate choice applies either way.
Tip: Reach for Hardware when you’re exporting long videos and want them done sooner. Keep Software when you need the most predictable, highest-compatibility result.
Set the resolution and frame rate
Section titled “Set the resolution and frame rate”By default both Resolution and Frame rate are set to Same as sequence, so the export matches your project. You can override either one:
- Resolution — export at a standard size instead of the sequence size. The landscape choices are 4K UHD, 1080p, 720p, and 480p; for phone-first platforms there are also 4K Portrait (2160 × 3840), 1080p Portrait (1080 × 1920), 720p Portrait (720 × 1280), 4:5 Portrait (1080 × 1350), and Square (1080 × 1080). The line below the menus shows the exact Output resolution you’ll get. Exports are capped at 4K in whichever orientation you pick, so a larger sequence is scaled down to fit — the note tells you when that happens.
- Frame rate — export at a standard rate such as 23.976, 24, 25 (PAL), 29.97 (NTSC), 30, 50, 59.94, or 60.
Leave both on Same as sequence unless a destination requires a specific size or frame rate.
Add burn-ins
Section titled “Add burn-ins”Burn-ins stamp information permanently onto the exported picture — useful for review copies and drafts. Each one has its own position menu with nine placement options (Top Left through Bottom Right). You can turn on any combination:
- Timecode — the running timecode, so reviewers can point to an exact moment.
- Clip name — the name of the clip playing at each point.
- Watermark text — type your own text (a name, “DRAFT”, a copyright line) into the box to stamp it on every frame.
Burn-ins are baked into the video and can’t be removed afterward, so use them for review exports rather than your final master.
Add handles
Section titled “Add handles”Handles add a few extra frames before and after your exported range. Type a
number of frames into the box (the default is 0). This is mainly useful when
you’re exporting an In/Out range and the
person receiving the file may need a little padding on each end to work with.
For a normal full-sequence export you can leave it at 0.
Choose how color is handled
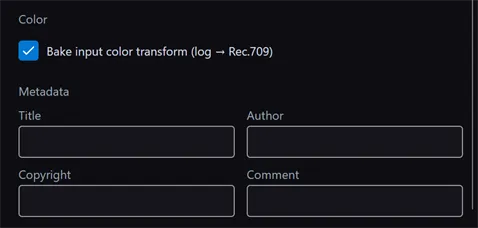
Section titled “Choose how color is handled”Bake input color transform (log → Rec.709) is on by default, and for most projects that’s what you want: your exported file looks exactly like the preview, with any log or camera footage converted to standard colors.
Turn it off only if you’re handing the file to another program for color grading and want your log footage to stay in its original log form. See Working with log and camera footage for background on log media.
Add file details (metadata)
Section titled “Add file details (metadata)”The Metadata fields — Title, Author, Copyright, and Comment — are written into the exported file so players and media libraries can display them. They’re optional, and they come pre-filled from the defaults you set in Edit ▸ Preferences, so you don’t have to retype the same author or copyright on every export.
Save and reuse presets
Section titled “Save and reuse presets”If you often export with the same settings, save them as a preset so you can pick them from the Preset menu next time.
- Set up the Format, codecs, rate control, resolution, and frame rate the way you want them.
- Click Save Preset… and give it a name.
- Your preset now appears in the Preset menu, ready to reuse.
Sprocket also ships with ready-made presets covering the most common deliveries:
| Preset | Good for |
|---|---|
| MP4 · H.264 + AAC | Everyday sharing and uploads |
| MP4 · HEVC + AAC | Smaller files at the same quality |
| MP4 · AV1 + AAC | Modern, efficient web delivery |
| MOV · ProRes 422 + PCM | High-quality master or handoff to another editor |
| MKV · HEVC + FLAC | Archival with lossless audio |
| WebM · VP9 + Opus | Royalty-free web video |
| YouTube 4K (HEVC) | 4K uploads |
| YouTube 1080p (H.264) | 1080p uploads |
| Web 720p (H.264) | Lightweight web video |
Picking a preset fills in the format and rate control for you; you can still adjust anything afterward (which switches the Preset menu back to Custom). Burn-ins, handles, encoding, color handling, and metadata aren’t part of a preset — they’re per-export choices you set each time.
Tip: Saving a preset with a name you’ve used before replaces the old one.
While it exports
Section titled “While it exports”After you click Export… and choose where to save the file, a progress window shows how far along the export is.
- To stop early, click Cancel. Sprocket stops and removes the partial file so you’re never left with a broken video.
- When it finishes, Sprocket asks if you’d like to Open folder — click it to jump straight to the finished file in your file browser.
The rest of the app is paused while an export runs, so let it finish (or cancel it) before continuing to edit. To keep working while videos render, or to line up several at once, use the Export Queue.
Export the audio only
Section titled “Export the audio only”You can export just the sequence’s sound — no video — for example to hand a mix to someone or to make an audio-only version.
- Open the Export Settings window (Export, or
Ctrl+E). - In the Format menu, scroll to the Audio only entries and pick one: WAV / PCM, FLAC, MP3, AAC (M4A), or Opus.
- The video options disappear, leaving just the audio format and metadata. Click Export… and choose where to save.
WAV / PCM and FLAC are lossless (larger files, no quality loss); MP3, AAC, and Opus are compressed (smaller files). Audio-only exports respect the Range setting too, so you can export just a marked section of the mix.
Format reference
Section titled “Format reference”Every format accepts a specific set of video and audio codecs. Sprocket only offers valid combinations, but this table shows what each one supports:
| Format | Video codecs | Audio codecs |
|---|---|---|
| MP4 | H.264, HEVC, AV1, MPEG-2 | AAC, MP3, AC-3 |
| QuickTime (MOV) | H.264, HEVC, AV1, ProRes 422, MPEG-2 | AAC, PCM, AC-3 |
| Matroska (MKV) | H.264, HEVC, AV1, VP9, MPEG-2, ProRes 422 | AAC, MP3, PCM, FLAC, AC-3, Opus |
| WebM | VP9, AV1 | Opus |
| AVI | H.264, MPEG-2 | MP3, PCM |
| MPEG transport stream | H.264, HEVC, MPEG-2 | AAC, AC-3, MP3 |
Audio-only exports:
| Audio format | Extension | Lossless? |
|---|---|---|
| Waveform Audio (WAV / PCM) | .wav | Yes |
| FLAC | .flac | Yes |
| MP3 | .mp3 | No |
| AAC (M4A) | .m4a | No |
| Opus | .opus | No |
Where to go next
Section titled “Where to go next”- Export several files at once, or hand off to another editor — batch exports with the Export Queue, and EDL / Final Cut XML interchange.
- Getting started with Sprocket — build an edit from first playback to this export step.