Marks and markers
As your edit grows, you’ll want ways to point at specific moments — “start the export here,” “this is where the music drops,” “come back and fix this cut.” Sprocket gives you two tools for that: in and out marks define a range of the timeline to work on, and markers drop labelled pins at single moments you want to find again.
Both live on the timeline ruler and work no matter which editing tool is active.
What’s in this guide
Section titled “What’s in this guide”- In and out marks
- Play just the marked range
- Lift and Extract
- Marks in the Source monitor
- Markers
- The Markers panel
In and out marks
Section titled “In and out marks”An in point and an out point define a range of your sequence — the part you want to play, render, or export. You set them at the playhead:
I— set the in point at the playheadO— set the out point at the playhead
The marked range appears as a shaded band across the ruler, with a brighter edge at each end:

To clear a mark, hold Alt:
Alt+I— clear the in pointAlt+O— clear the out point
You don’t have to set them in order. If you set an in point later than the current out point (or an out point earlier than the in point), Sprocket clears the conflicting mark so the range always makes sense.
Marks belong to the sequence you’re working in. If you switch to another sequence and come back, each sequence keeps its own in and out points. They’re saved with the project, and setting or clearing a mark is an ordinary undoable edit.
More ways to set and use marks, all on Sequence ▸ In / Out:
X— Mark Clip: mark the start and end of the clip under the playhead (on the topmost targeted video track, or else the first targeted audio track)/— Mark Selection: mark from the start of the earliest selected clip to the end of the latest oneShift+I/Shift+O— Go to In / Go to Out: jump the playhead to a markCtrl+Shift+X— Clear In and Out
Tip: In and out marks are what the Export dialog’s In/Out range option and the Sequence ▸ Render In to Out command act on. Set them once and every “just this part” action uses the same range.
Play just the marked range
Section titled “Play just the marked range”Once you’ve set an in and an out point, choose Sequence ▸ Play In to Out
(Ctrl+Shift+Space) to preview only that stretch. Playback starts at the in
point, stops at the out point, and loops back to the in point so you can watch
the same section over and over while you fine-tune it.
If only one mark is set, playback fills in the missing end — a range with just an in point plays to the end of the sequence, for example. With no marks at all, it simply plays the whole sequence.
Plain playback with Space ignores the marks entirely, so you always have one
key for “play everything” and one for “play just this bit.”
Lift and Extract
Section titled “Lift and Extract”Two commands on the Sequence menu remove the marked range from your sequence in one go:
;— Lift removes everything in the range and leaves a gap.'— Extract removes everything in the range and slides the rest of the sequence left to close the gap, so the sequence gets shorter.
They act only on targeted tracks, and clips that cross a mark are split at it so only the part inside the range goes. When Extract closes the gap, every targeted or sync-locked track shifts left. A sync-locked track that has material inside the range but isn’t targeted can’t shift without cutting it, so it stays put and the status bar warns that it may now be out of sync. Locked tracks are never touched.
If only one mark is set, the range runs from it to the start or end of the sequence; with no marks set, nothing happens. Afterwards the marks are cleared and the playhead parks at the old in point. Either command is one undo step.
Marks in the Source monitor
Section titled “Marks in the Source monitor”The Source monitor has in and out marks of its own. They pick the part of a media file to cut into your sequence with Insert and Overwrite — see Three-point editing.
The same keys set them. Which marks a key acts on depends on which monitor is active:
- With the Source tab showing and the monitor the active pane (it is right
after you double-click a bin item; otherwise click the Source picture),
I,O,Shift+I/Shift+O,Alt+I/Alt+O,Ctrl+Shift+X, andCtrl+Shift+Spaceact on the Source media, at the Source playhead. - Anywhere else — the timeline, or the Program tab — they act on the sequence, as described above.
Source marks belong to the media item, not the sequence: each file in the bin remembers its own marks, they’re saved with the project, and they’re still there when you open a different file and come back.
Markers
Section titled “Markers”A marker is a coloured pin on the ruler that flags a single moment — a good spot for a cut, a lyric to land a title on, a note to revisit. Unlike in/out marks (of which there’s one pair), you can drop as many markers as you like.
M— add a marker at the playheadShift+M— jump to the next markerCtrl+Shift+M— jump to the previous marker
New markers are added at the playhead with a default colour. Adding one and then jumping between them is the fastest way to lay down a rhythm of edit points and then move between them without hunting along the timeline.
The Markers panel
Section titled “The Markers panel”To see all your markers in one list, click Markers at the top-right of the Timeline pane. A small panel opens showing every marker in order:
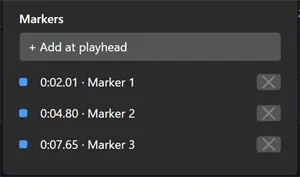
From here you can:
- Add a marker at the playhead with + Add at playhead — the same as
pressing
M. - Jump to a marker by clicking its label. The playhead moves to that marker’s time.
- Remove a marker with the ✕ button on its row.
Each row shows the marker’s time and name — for example 0:04.20 · Marker 2.
Markers you haven’t named show as Marker 1, Marker 2, and so on.
Tip: When the panel is empty it reminds you how to start: press
Mwith the playhead where you want the first marker.
Related
Section titled “Related”- Editing on the timeline — the editing tools, trimming, and rearranging clips.
- Three-point editing — cut a marked source range into the sequence with Insert and Overwrite.
- Export your finished video — where the in/out range comes into play.