Audio effects
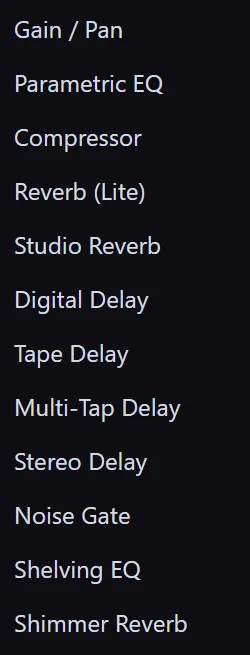
Beyond setting levels in the mixer, Sprocket ships a full library of audio effects: equalizers to shape tone, a compressor and noise gate to control dynamics, and a range of reverbs and delays to add space and echo. They work just like picture effects — you add them, then adjust their settings in the Inspector — and you can stack as many as you need.
What’s in this guide
Section titled “What’s in this guide”- Add an audio effect
- Start from a preset
- Levels & dynamics
- Equalizers
- Reverb
- Delay & echo
- Freeze a heavy audio chain
- Where to go next
Add an audio effect
Section titled “Add an audio effect”You can put an audio effect in two places:
- On a single clip — select an audio clip on the timeline, then open the Effects menu and choose an effect. (With an audio clip selected, the menu lists the audio effects; with a video clip selected it lists the picture effects.) You can also drag an effect from the Project panel’s Effects tab onto a clip, or use the + Effect button at the bottom of the Inspector.
- On a whole track, bus, or the master — add it as an insert in the mixer, so it processes everything on that track rather than one clip.
However you add it, the effect appears as a section in the Inspector with a slider and a value box for each setting. Drag a slider or type a value to change it.
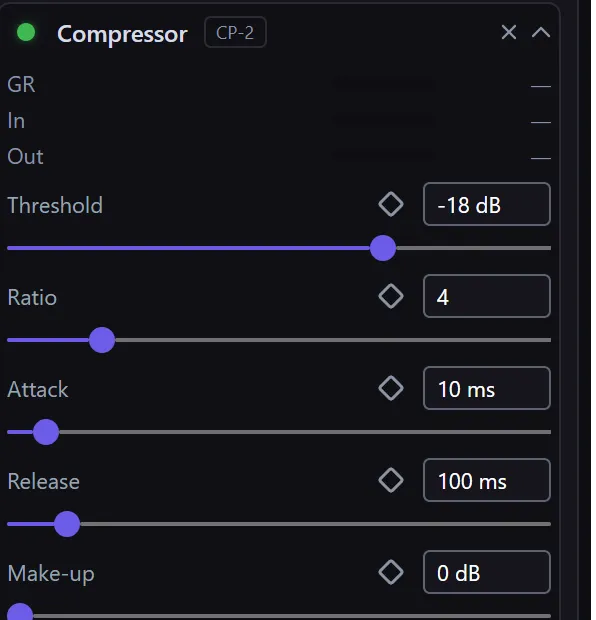
- The dot at the left of the effect’s heading turns it on or off; the ✕ removes it.
- The small diamond next to each setting is for keyframing — animating the value over time.
Tip: Most reverbs and delays have a Mix setting — the balance between the original (“dry”) sound and the effect (“wet”). At 0 you hear only the original; at 1 only the effect. Start low and bring it up until it feels right.
Start from a preset
Section titled “Start from a preset”Some effects — the reverbs especially — have a Preset picker at the top of their Inspector section. Instead of setting a dozen sliders by hand, choose a starting point from the Choose… dropdown, then tweak from there.
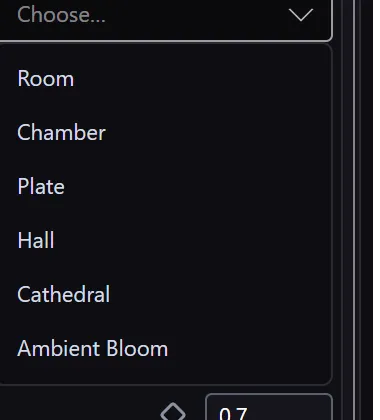
Picking a preset is a single step you can undo, so it’s safe to try a few.
Levels & dynamics
Section titled “Levels & dynamics”Gain / Pan
Section titled “Gain / Pan”The simplest audio effect: Gain raises or lowers the clip’s volume, and Pan places it in the stereo field (left to right). Handy when you want to adjust one clip without touching the whole track’s mixer level.
Compressor
Section titled “Compressor”A compressor evens out a performance — it turns down the loud parts so you can bring the whole thing up, giving voices and music a steadier, fuller sound. The main controls:
- Threshold — the level above which the compressor starts working. Lower it to compress more of the signal.
- Ratio — how hard it clamps down once past the threshold (a ratio of 4 means 4 dB in becomes 1 dB out).
- Attack and Release — how quickly it reacts when the sound gets loud, and how quickly it lets go afterward.
- Make-up — gain added back after compressing, to restore overall volume.
The meters at the top (GR, In, Out) show gain reduction and the in/out levels as it works.
Noise Gate
Section titled “Noise Gate”A noise gate does the opposite of a compressor: it silences the sound when it drops below a set level, cleaning up background hiss or room noise between words. Set the Threshold just above the noise floor; Attack, Hold, and Release shape how smoothly the gate opens and closes, and Range sets how far it turns the quiet parts down.
Equalizers
Section titled “Equalizers”Parametric EQ
Section titled “Parametric EQ”A three-band equalizer for shaping tone — a low shelf, a sweepable mid bell, and a high shelf. Each band has a Gain (boost or cut) and a Freq (which frequencies it affects); the mid band adds a Q control for how wide or narrow a range it touches. Use it to add warmth, cut boominess, or brighten a dull recording.
Shelving EQ
Section titled “Shelving EQ”A simpler tone control with just a low shelf and a high shelf — lift or lower everything below or above a chosen frequency. Each shelf has its own Freq, Gain, and Slope, and can be switched on or off independently. Reach for this for quick “more bass” / “less treble” adjustments.
Reverb
Section titled “Reverb”Reverb adds the sense of a physical space — a room, a hall, a cathedral — around a sound.
Reverb (Lite)
Section titled “Reverb (Lite)”The everyday, low-CPU reverb. Just three controls — Room Size, Damping, and Mix — for a quick sense of space without taxing your machine. Good for editorial work and rough passes.
Studio Reverb
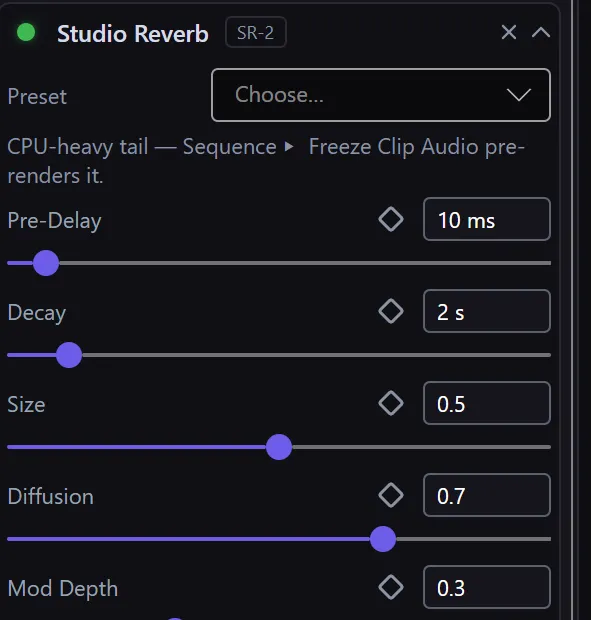
Section titled “Studio Reverb”A high-quality algorithmic reverb for rooms, plates, and halls, with much finer control — Pre-Delay, Decay, Size, Diffusion, stereo Width, separate Low Damp / High Damp, and subtle modulation (Mod Depth / Mod Rate). Start from a preset (Room, Chamber, Plate, Hall, Cathedral, or Ambient Bloom) and adjust to taste.
Shimmer Reverb
Section titled “Shimmer Reverb”An ethereal, pitched-up reverb wash — the reverb tail is shifted up in pitch to create a shimmering, atmospheric effect. The Interval control sets how far up (in semitones; 12 is one octave), and Shimmer sets how much of it you hear. Presets include Classic Shimmer, Dark Shimmer, Fifth Shimmer, and Drone / Infinite.
Delay & echo
Section titled “Delay & echo”Digital Delay
Section titled “Digital Delay”A clean, modern echo. Set the Time between repeats, the Feedback (how many repeats you get), and a High Cut to soften each repeat.
Tape Delay
Section titled “Tape Delay”The same idea with the warmth and wobble of vintage tape — Wow / Flutter and Saturation add the gentle pitch drift and coloration that give tape echoes their character.
Multi-Tap Delay
Section titled “Multi-Tap Delay”Up to eight separate echoes (“taps”), each with its own Time, Level, and Pan. Turn taps on or off individually to build rhythmic, spread-out echo patterns.
Stereo Delay
Section titled “Stereo Delay”Independent delay times for the left and right channels, with a Ping Pong mode that bounces the echoes back and forth across the stereo field.
Freeze a heavy audio chain
Section titled “Freeze a heavy audio chain”Rich effects like Studio Reverb and long delays take real work to calculate, and stacking several on a clip can make playback stutter. When that happens, you can freeze the clip’s audio: Sprocket renders the processed sound once and plays it back from disk instead of recomputing it every time.
Select the clip and choose Freeze Clip Audio from the Sequence menu. To go back to editing the effects, choose Unfreeze Clip Audio.
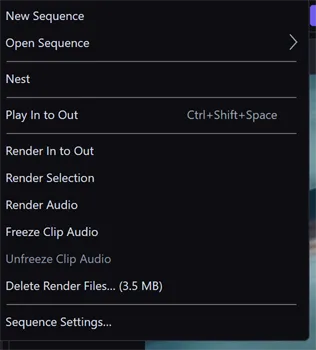
Tip: The Inspector reminds you about this — effects with a heavy tail show a note pointing to Sequence ▸ Freeze Clip Audio right under their name.
Where to go next
Section titled “Where to go next”- Audio levels & the mixer — set track gain and pan, read loudness meters, and add these effects as track/bus/master inserts.
- Keyframing & animation — animate any effect setting so it changes over time.
- Effects & the effect stack — how adding, adjusting, and stacking effects works across the app.