Aspect ratio and framing
The shape of your video — tall for phones, square for a feed, wide for a screen — is set by your sequence, not by your footage. Sprocket lets you pick that shape when you create a sequence (or change it later), and then gives every clip a simple choice for how it fills the frame when its own shape doesn’t match: Fit or Fill. This guide covers both, which is all you need to make a vertical clip for TikTok, Reels, or Shorts, a square post, or a widescreen edit.
What’s in this guide
Section titled “What’s in this guide”- Choose your video’s shape
- Change a sequence’s shape later
- Fit or Fill: how a clip meets the frame
- The Framing controls
Choose your video’s shape
Section titled “Choose your video’s shape”When you start a new sequence, Sprocket asks what shape and size it should be. Choose Sequence ▸ New Sequence and the New Sequence dialog opens with a Frame size picker:
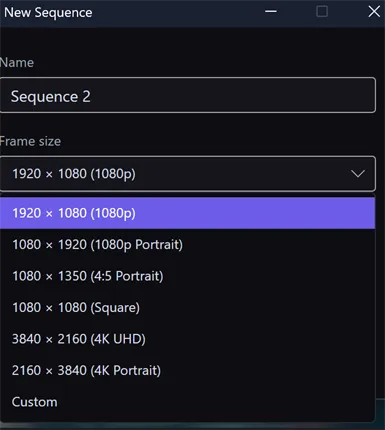
Pick a preset that matches where the video will end up:
- 1920 × 1080 (1080p) and 3840 × 2160 (4K UHD) — standard widescreen, for YouTube, TVs, and computer screens.
- 1080 × 1920 (1080p Portrait) and 2160 × 3840 (4K Portrait) — full-height vertical, for TikTok, Instagram Reels, and YouTube Shorts.
- 1080 × 1350 (4:5 Portrait) — the taller-than-wide shape that fills more of the screen in an Instagram or Facebook feed.
- 1080 × 1080 (Square) — a square post.
- Custom — type any width and height into the Width and Height boxes for a size that isn’t in the list.
The frame rate and audio sample rate shown below the size (for example
29.99 fps · 44.1 kHz) are fixed — a new sequence matches the frame rate and
sample rate of the one you’re already in, so everything in a project stays in
step. Give the sequence a Name and click Create, and Sprocket switches to
your new, empty timeline.
Tip: Set your sequence shape before you start editing. Every clip you drop in is framed to fit the sequence, so choosing vertical up front saves you re-framing shots later.
Change a sequence’s shape later
Section titled “Change a sequence’s shape later”You’re not locked in. Choose Sequence ▸ Sequence Settings… to rename the current sequence or change its frame size at any time — the same presets and Width / Height boxes as the New Sequence dialog:
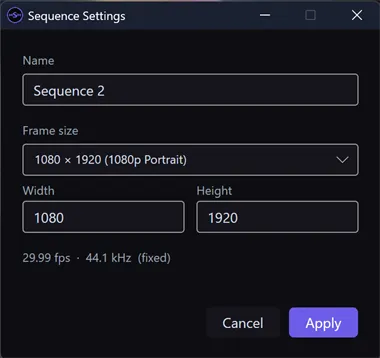
Click Apply and the timeline re-frames to the new shape. Every clip keeps its own Fit or Fill setting (below), so they re-fit to the new frame automatically — handy for turning a widescreen edit into a vertical cut.
For more on juggling several sequences in one project, see Working with more than one sequence.
Fit or Fill: how a clip meets the frame
Section titled “Fit or Fill: how a clip meets the frame”When a clip is a different shape from your sequence — landscape footage in a portrait sequence, say — Sprocket has to decide what to do with the parts that don’t line up. Each clip carries one of two answers:
- Fit (the default) scales the clip so the whole picture fits inside the frame, leaving empty bars along the edges that don’t reach — black bars above and below a wide clip in a tall frame (letterboxing), or on the sides of a tall clip in a wide frame (pillarboxing). Nothing is cropped; you see the entire shot.
- Fill scales the clip up until it covers the whole frame, cropping whatever spills over the edges. No bars, but you lose the edges of the picture.
Here’s the same landscape clip in a vertical (1080 × 1920) sequence, first with Fit, then with Fill:
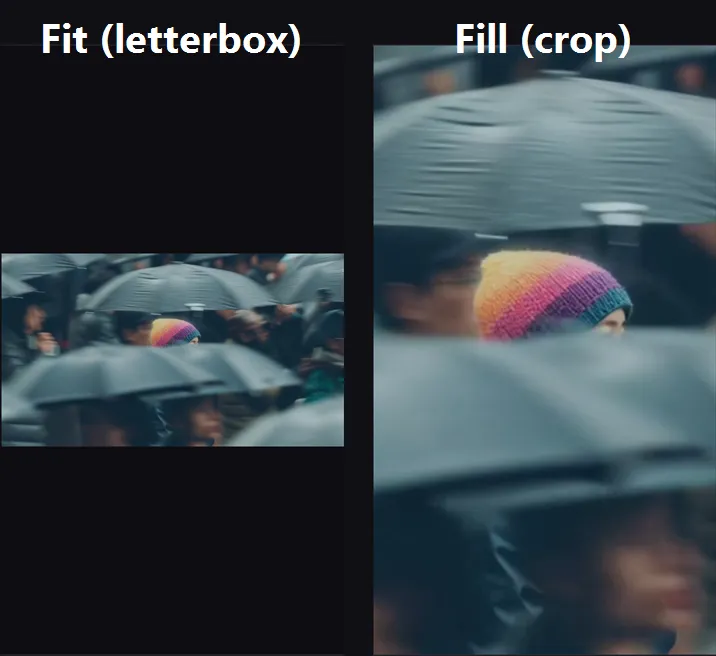
Fit keeps the whole shot but wastes screen space; Fill uses the whole screen but hides the edges. For vertical video from landscape footage, Fill is usually the one you want when the action sits near the middle of the frame.
The Framing controls
Section titled “The Framing controls”Framing is set per clip, in the Inspector. Select a clip on the timeline and open the Framing section:
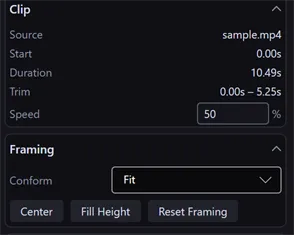
- Conform — the dropdown that switches the clip between Fit and Fill, as described above.
- Center — recenters the picture in the frame. Use it after you’ve nudged a clip off-center and want it back in the middle.
- Fill Height — scales the picture so it spans the full height of the frame. This is a quick way to make a wide clip reach top-to-bottom in a vertical sequence, cropping the sides.
- Reset Framing — clears any manual sizing and repositioning you’ve applied and returns the clip to a plain Fit or Fill. (Your Conform choice is kept.)
Center, Fill Height, and Reset Framing are shortcuts that work through the clip’s Transform effect — so after using them you can fine-tune the exact scale and position with Transform’s sliders, or animate the framing so a shot slowly pushes in. For finer control than Fit or Fill alone, reach for Transform.
The Framing section appears for clips that show a picture in the frame — video clips, nested sequences, and multicam clips. Audio clips, titles, and adjustment layers don’t have it: audio has no picture, and titles and adjustment layers are drawn at the sequence’s own size.
Related
Section titled “Related”- Multicam and sequences — create and switch between the sequences whose shape you’re setting here.
- Effects — the Transform effect, for scaling and positioning beyond Fit and Fill.
- Exporting — the portrait and square output resolutions for delivering your finished vertical or square video.