Keyframing & animation
Most effect settings hold a single value for the whole clip. Keyframing lets a setting change over time instead — so a clip can slowly zoom in, a title can drift across the screen, or a grade can bloom brighter toward the end. You mark a value at one moment and a different value at another, and Sprocket animates smoothly between them. Almost every setting in the Inspector — Transform position and scale, Color, Brightness, the color-grading controls, and more — can be keyframed the same way.
What’s in this guide
Section titled “What’s in this guide”- How keyframing works
- Animate a setting
- The keyframe lane
- Editing keyframes
- Jumping between keyframes
- Change the speed of a change: the velocity graph
- Interpolation: how one keyframe reaches the next
- Turn keyframing back off
- Where to go next
How keyframing works
Section titled “How keyframing works”A keyframe is a saved value pinned to a moment in time. When a setting has two or more keyframes, Sprocket fills in every frame between them, so the value glides from one to the next as the clip plays. Two keyframes are enough to create movement:
- Zoom in: a Transform scale of
100%at the start and120%at the end. - Slide on: a Transform position off-screen at the start and centered a second later.
- Reveal a grade: exposure flat at the start, lifted by the end.
Everything happens at the playhead — the vertical line that marks the current frame. You move the playhead to a moment, set the value you want at that moment, and Sprocket records a keyframe there.
Animate a setting
Section titled “Animate a setting”You’ll need a clip on the timeline with an effect applied — see Effects & the effect stack if you haven’t added one yet.
-
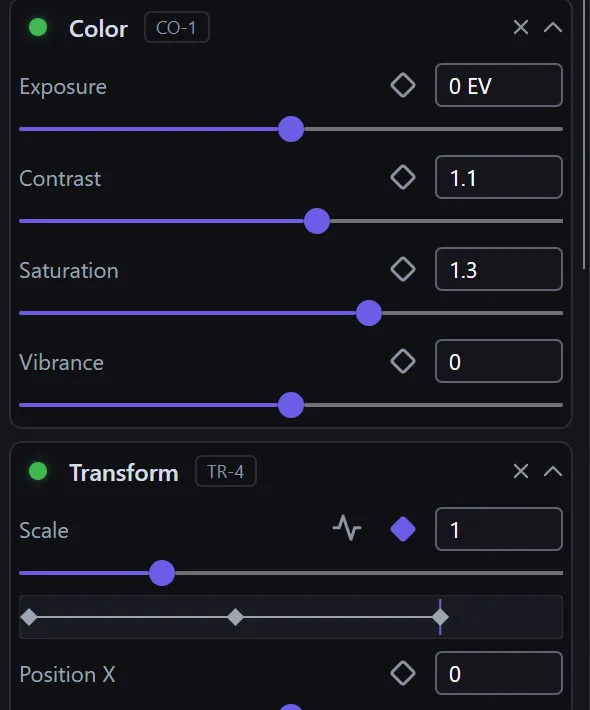
Select the clip and look at its effect in the Inspector. Every setting that can be animated has a small diamond button next to its value box.
-
Move the playhead to where you want the animation to begin.
-
Click the diamond button. Keyframing turns on for that setting: the diamond lights up, a keyframe lane appears beneath the slider, and a first keyframe is placed at the playhead holding the current value.
-
Move the playhead to where you want the animation to end.
-
Change the value — drag the slider or type a new number in the box. Sprocket automatically adds a second keyframe at the playhead.
Play the clip back and the setting now animates between the two keyframes. Add as many keyframes as you like: each time you move the playhead and change the value, a keyframe is recorded there.
Tip: Every keyframe edit is undoable. If an animation goes wrong,
Ctrl+Zsteps back through it just like any other change.
The keyframe lane
Section titled “The keyframe lane”Once a setting is animated, a thin keyframe lane sits under its slider. It’s a small timeline of just that setting: each keyframe is a marker, and the bright vertical line is the playhead, so you can see at a glance where your keyframes fall relative to the current frame.
The marker’s shape tells you how it reaches the next keyframe:
| Marker | Interpolation | Feel |
|---|---|---|
| ◆ Diamond | Linear | Steady, constant-rate change |
| ● Circle | Eased | Accelerates and/or decelerates |
| ⬡ Hexagon | Custom (Bezier) | A curve you shape by hand |
| ■ Square | Hold | No blend — the value jumps and stays |
Editing keyframes
Section titled “Editing keyframes”You work with keyframes directly in the lane:
- Move a keyframe — drag it left or right to change when it happens.
- Add a keyframe — double-click an empty spot in the lane.
- Delete a keyframe — right-click it.
- Change its interpolation — double-click the keyframe to cycle through the modes (Linear → Ease In → Ease Out → Ease In/Out → Custom → Hold → and back). The marker changes shape as you go.
- Select several at once — Shift-click keyframes to add or remove them from the selection, or drag a box (a rubber-band) across the lane. Dragging any selected keyframe moves the whole group together, and right-click deletes all of them.
Tip: Hover over the lane and Sprocket shows a reminder of these actions in a tooltip.
Jumping between keyframes
Section titled “Jumping between keyframes”To land the playhead exactly on a keyframe — handy for changing its value precisely — use the bracket keys while a clip with keyframed settings is selected:
| Shortcut | What it does |
|---|---|
[ | Jump to the previous keyframe |
] | Jump to the next keyframe |
These are also listed on the keyboard shortcuts page.
Change the speed of a change: the velocity graph
Section titled “Change the speed of a change: the velocity graph”Straight-line (Linear) keyframes change at a constant rate, which can look mechanical. To make a move ease in or out — start slow, speed up, glide to a stop — open the velocity graph.
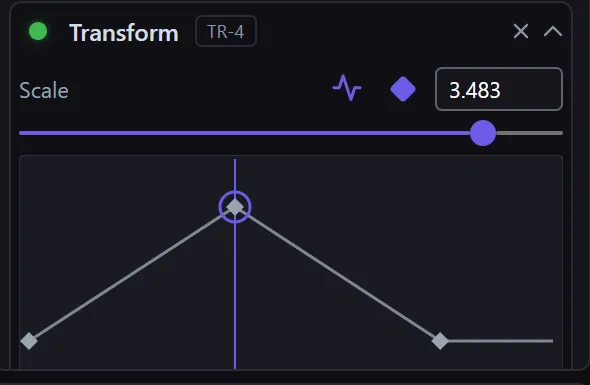
Once a setting is animated, a small graph button appears next to the diamond. Click it to expand the keyframe lane into a taller graph that plots the value over time, drawing the live animation curve so you can see the motion, not just the keyframes.
In the graph you can:
- Drag a keyframe up or down to change its value, or left/right to change its timing.
- Shape a curve by hand. Double-click a keyframe until it becomes a Custom (hexagon) keyframe, and the segment leaving it grows two handles. Drag a handle to bend the curve — pull it flat for a gentle ease, steep for a sharp one.
Click the graph button again to collapse back to the compact lane. The animation is the same either way; the graph is just a bigger canvas for fine-tuning.
Interpolation: how one keyframe reaches the next
Section titled “Interpolation: how one keyframe reaches the next”“Interpolation” is simply the rule Sprocket uses to get from one keyframe’s value to the next. Each keyframe carries its own, which you set by double-clicking it (in the lane or the graph):
- Linear — a constant, even rate of change. Good for steady moves.
- Ease In / Ease Out / Ease In-Out — the change accelerates, decelerates, or both, so motion starts and stops gently. This is what makes an animation feel natural.
- Custom — you draw the curve yourself with the handles in the velocity graph.
- Hold — no blending at all. The value stays put and then jumps to the next keyframe’s value at that keyframe’s moment. This is the right choice for on/off switches and other settings that shouldn’t glide through in-between values — which is why on/off and whole-number settings use Hold by default.
Turn keyframing back off
Section titled “Turn keyframing back off”To stop animating a setting, click its lit diamond button again. The keyframe lane disappears and the setting goes back to a single constant value — whatever it was at the playhead at that moment. Its keyframes are removed, so turn keyframing off only when you’re sure you want the setting to hold still again.
Where to go next
Section titled “Where to go next”- Effects & the effect stack — add and adjust the effects whose settings you’re animating.
- Titles, generators & layers — titles have ready-made Animate ▾ entrance and exit presets that author keyframes for you.
- Color grading — the grading controls are keyframeable too, for grades that change across a shot.