Importing and organizing media
Before you can edit, Sprocket needs to know about your footage. Importing adds your video, audio, and image files to the project’s library — the media bin in the Project panel — so you can drag them onto the timeline when you’re ready. Importing never moves or changes your original files; it just points Sprocket at them.
This guide covers getting media in, reading what the bin tells you about each file, and a few special cases: still images, numbered image sequences, transparent (alpha) clips, and changing the frame rate Sprocket assumes for a piece of footage.
What’s in this guide
Section titled “What’s in this guide”- Import media into your project
- Supported file formats
- The Project panel
- Reading the media bin
- Finding media in the bin
- Putting media on the timeline
- Still images
- Image sequences
- Transparent (alpha) media
- Interpret Footage: changing a clip’s frame rate
Import media into your project
Section titled “Import media into your project”There are two ways to bring files in:
- File ▸ Import Media… (
Ctrl+I) opens a file picker titled Import Media. Pick one file or select several at once, then confirm. The files are added to the Media bin. - Drag files straight from your file browser (File Explorer, Finder) onto the Project panel. This imports them the same way.
Either way, the status bar confirms what happened — for example, Imported 3 files. If a file can’t be read, Sprocket tells you which one and why, and imports the rest.
Tip: Importing only adds a file to your project’s library — it doesn’t put anything on the timeline yet. See Putting media on the timeline for that.
Supported file formats
Section titled “Supported file formats”Sprocket reads a wide range of formats. In the Import Media picker, the file-type menu lets you narrow the view to Video, Audio, or Images (it starts on Media files, which shows all of them together).
- Video:
.mp4,.m4v,.mov,.mkv,.webm,.avi,.mxf,.ts,.m2ts,.mts,.mpg,.mpeg,.wmv,.flv,.ogv,.3gp - Audio:
.wav,.mp3,.aac,.m4a,.flac,.ac3,.opus,.ogg,.wma,.aif,.aiff - Images:
.png,.jpg,.jpeg,.tif,.tiff,.bmp,.tga,.webp,.dpx
Tip: You don’t have to convert your footage first. Sprocket includes everything it needs to read these formats — there’s nothing extra to install.
The Project panel
Section titled “The Project panel”The Project panel on the left is your library and your browser for things you can add to a clip. It has four tabs across the top:
- Media — the media bin: everything you’ve imported, shown as thumbnails. This is where you drag footage from onto the timeline.
- Effects — a browser of every effect. Double-click one to add it to the selected clip, or drag it onto a clip. See Effects & the effect stack.
- Transitions — a browser of transitions like Cross Dissolve. Drag one onto a cut between two clips, or double-click to add it to the selected clip’s cut. See Transitions.
- Audio — your audio-only files as waveform tiles, or the mixer when it’s open. See Audio levels & the mixer.
The active tab is shown in bold. A search box sits under the tabs on the Media tab.
Reading the media bin
Section titled “Reading the media bin”Each item in the Media bin is a tile with a thumbnail, the file’s name, and a row of small badges that summarize the file at a glance.
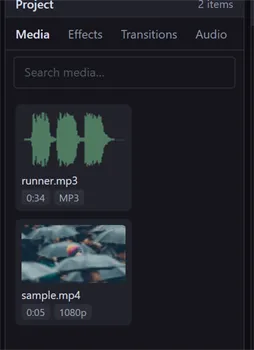
- Thumbnail — a still frame from the video, or a waveform picture for audio-only files.
- Duration — always the first badge, shown as minutes and seconds (for example, 0:05).
- Resolution — for video, a size label: 4K, 1080p, 720p, or the exact width × height for other sizes.
- Format — for audio-only files, the file type as a tag (for example, WAV or MP3).
A few special kinds of media add their own leading badge: STILL for a single image, SEQ for an image sequence, and Alpha for video with transparency. Those are covered below.
Finding media in the bin
Section titled “Finding media in the bin”As a project grows, the bin fills up. Use the Search media… box at the top
of the Media tab to filter it: start typing part of a file’s name and the
bin shows only matching files as you type. The match ignores capitalization and
looks anywhere in the name, so typing beach finds Beach_Sunset.mp4.
Clear the box to show everything again.
Putting media on the timeline
Section titled “Putting media on the timeline”Importing builds your library; to actually use a file, drag it out of the bin onto a track:
- Click the Media tab so you can see your files.
- Drag a tile down onto a track in the Timeline — a video onto a video track (V1), audio onto an audio track (A1).
- Drop it where you want it to start. While you drag, a translucent outline shows exactly where the clip will land. A clip appears on the track.
A video that was recorded with its own sound places both its picture and audio together, linked so they stay in sync. The half you drop lands on the track under the pointer; the other half goes to the track its V1 / A1 source indicator is on at the left of the track headers (normally the first track of that kind).
A drop replaces what’s already there. If the spot you drop on already holds clips, the new clip overwrites that stretch of the track, trimming or removing whatever it covers. Nothing else on the timeline moves.
Hold Ctrl while you drop to insert instead (Cmd on a Mac). The existing
clips split at the drop point and everything after it slides right to make
room, on the tracks you’re dropping onto and on any sync-locked tracks. While
you hold the key, small arrows on those tracks show what will be pushed.
If you’ve set in and out marks on the file in the Source monitor, dragging it from the bin uses only that marked range. You can also drag straight from the Source monitor — its picture, or the video-only and audio-only handles under it to bring in just one of the two.
From here you trim, move, and arrange the clip like any other — see Editing on the timeline.
Still images
Section titled “Still images”A single image imports as a still clip — its tile carries a STILL badge. On the timeline it plays for a fixed length (like a photo held on screen), which you can then trim to any duration you like.
New stills start at 5 seconds by default. To change that default for future
imports, open Edit ▸ Preferences… (Ctrl+,), find the Import section,
and set Still image default duration (seconds). This only affects stills you
import afterward; it doesn’t change images already in your project.
Image sequences
Section titled “Image sequences”Some footage — especially stop-motion, time-lapses, and renders from other
software — comes as a folder of numbered still frames (frame_0001.png,
frame_0002.png, and so on) rather than a single movie file. Sprocket can
import a run like this as one clip.
When you import (or drag in) any one frame of a numbered run, Sprocket looks in the same folder for the rest of the consecutively numbered frames. If it finds a run of two or more, the Import Image Sequence dialog appears:
- It reports how many frames it found and their size — for example, Detected 240 numbered frames · 1920×1080 — with the detected naming pattern below.
- Import as image sequence is turned on. Leave it checked to bring the whole run in as a single clip. (Uncheck it to import just the one file you picked as a still instead.)
- Frame rate sets how fast the frames play. Choose from the stop-motion presets 12 fps, 15 fps, or 24 fps, or your project’s own frame rate — which is the default.
Click Import to add the sequence. Its bin tile shows a SEQ badge with the frame count and rate (for example, SEQ · 240 frames @ 12).
Tip: If the sequence plays too fast or too slow after importing, you don’t need to reimport it — use Interpret Footage to reassign its frame rate.
Transparent (alpha) media
Section titled “Transparent (alpha) media”Some video files — animated logos, lower-third graphics, motion overlays — carry an alpha channel that marks parts of the frame as transparent. Sprocket detects this on import and adds an Alpha badge to the file’s tile.
There’s nothing extra to switch on. Put the clip on a video track above your main footage (for example, V2 over V1), and its transparent areas let the picture on the lower track show through, while its opaque areas sit on top.
Interpret Footage: changing a clip’s frame rate
Section titled “Interpret Footage: changing a clip’s frame rate”Interpret Footage tells Sprocket to assume a different frame rate for a piece of footage without re-rendering it. The same frames play back — but faster or slower — so a clip’s duration on the timeline stretches or shrinks to match. It’s the tool for retiming an image sequence, or for the classic “shoot on twos” slowdown of any clip.
To change it:
- In the Media bin, right-click a video source (or right-click a video clip on the timeline).
- Choose Interpret Footage….
- In the dialog, the line under the file’s name reads, for example, Currently 24 fps. Assume this frame rate:. Pick a new rate from the list — it offers the common rates (12, 15, 23.976, 24, 25, 29.97, 30, 50, 59.94, and 60 fps) plus the footage’s current rate.
- Click OK.
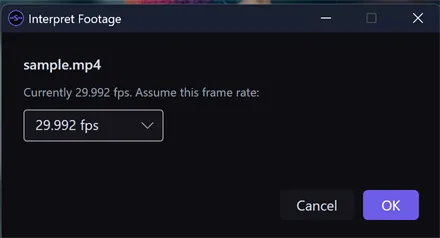
Every clip that uses that footage updates at once, and the bin’s duration badge
refreshes. Interpret Footage is a single step you can undo (Ctrl+Z) if the
result isn’t what you wanted. It’s offered only for footage that has a frame
rate — video clips and image sequences, not audio-only files.
Related
Section titled “Related”- Getting started — the quick tour and the most common editing tasks.
- Editing on the timeline — trim, arrange, and cut the clips once they’re on a track.
- Working with log & camera footage — convert flat log footage from a camera into a normal picture.