Proxies and rendering for smooth playback
Two things can make the preview stutter while you edit: heavy source footage (large 4K or high-frame-rate files your computer struggles to decode in real time) and heavy timelines (stacked effects, transitions, or nested sequences that take work to composite). Sprocket handles each with its own tool — proxies for the footage and rendering for the timeline — and both leave your final export untouched at full quality.
This guide explains what’s happening when playback lags, what the colored strip along the top of the timeline is telling you, and how to smooth things out.
What’s in this guide
Section titled “What’s in this guide”- Proxies: automatic help with heavy footage
- The render bar: what needs rendering
- Render a range for smooth playback
- Reclaim disk space
Proxies: automatic help with heavy footage
Section titled “Proxies: automatic help with heavy footage”A proxy is a lightweight, lower-resolution stand-in that Sprocket plays instead of a large source file, so the preview stays smooth. You don’t turn proxies on or create them — they’re fully automatic. When you import a file that’s too large to play back comfortably (bigger than 1080p), Sprocket quietly builds a proxy for it in the background. Until the proxy is ready the clip previews on its original; the moment the build finishes, the preview switches to the proxy with nothing for you to do.
You can keep working the whole time — proxies build on a background worker, and clips already on the timeline are built before ones still sitting in the bin.
While proxies are building, the status bar at the bottom of the window shows a quiet progress message such as building proxies… 2 ready, 3 pending. When they’re all done it briefly reads proxies ready (4). There’s no button or setting to tend — the message is just there to let you know why an imported clip got smoother a few seconds after it arrived.
Tip: Files already at 1080p or smaller play in real time as-is, so Sprocket never makes proxies for them. Still images and image sequences don’t get proxies either.
Proxies only ever affect the preview. When you export, Sprocket always goes back to your full-resolution originals, so using proxies never lowers the quality of the finished video.
The render bar: what needs rendering
Section titled “The render bar: what needs rendering”Effects, transitions, and nested sequences don’t come from a single video file, so a proxy can’t help with them — they have to be composited as they play. When a stretch of the timeline is too heavy to composite in real time, you can render it: Sprocket computes it once, ahead of time, and plays back the saved result smoothly.
The thin colored strip along the top of the timeline ruler — the render bar — tells you where rendering would help and where a range has already been rendered:
| Color | What it means |
|---|---|
| Green | Already rendered. This range plays back from a saved render, so it’s smooth. |
| Amber | Not rendered, but usually still plays in real time — clips with effects, or an adjustment layer. Render it if it stutters. |
| Red | Not rendered and hard for the preview to keep up with — nested sequences and transition blends. The best candidate for rendering. |
Where the strip is bare, that part of the timeline plays in real time with nothing to render.
Rendering is tied to the exact content of a range. If you edit a clip inside a green (rendered) stretch, that part drops back to amber or red because the result has changed — but undo brings the green back instantly, with no need to render again.
Render a range for smooth playback
Section titled “Render a range for smooth playback”Rendering commands live in the Sequence menu. Each one renders a different part of the timeline:
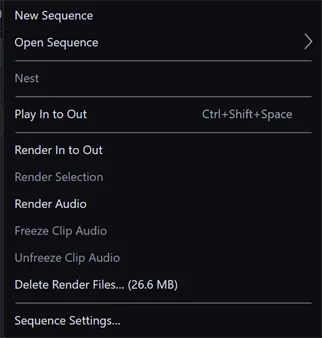
- Render In to Out — renders the range between your in and out marks. If you haven’t set any marks, it renders the whole sequence. This is the one to reach for most of the time. (See In and out marks for setting the range.)
- Render Selection — renders just the selected clip’s span. Select a clip first, or this stays greyed out.
- Render Audio — renders the master audio mix over the in/out range. Useful when heavy audio effects (like reverbs) make playback stutter.
While a render runs, the rest of the window is disabled and a small progress window appears with a Cancel button, so you can stop a long render at any time. When it finishes, the render bar turns green over that range and the status bar confirms it — for example, Rendered 00:00:02–00:00:07. If you cancel, playback simply stays live for that range.
Tip: If you try to render a range that’s already been rendered, Sprocket tells you That range is already rendered rather than doing the work twice.
To render the audio on a single heavy clip instead of the whole mix, use Freeze Clip Audio — it’s the same idea as Render Audio, scoped to one selected clip, and it’s covered in Freeze a heavy audio chain.
Reclaim disk space
Section titled “Reclaim disk space”Rendered ranges are saved to a cache on disk so they survive restarts. Over a long project that cache can grow, and you can clear it whenever you like without losing any of your work.
Open the Sequence menu and look at Delete Render Files… — its label shows how much space the current project’s renders are using, for example Delete Render Files… (1.4 GB). If there are no renders to remove, the item is greyed out.
Choose it and Sprocket asks you to confirm, showing where the files live and how much will be freed:
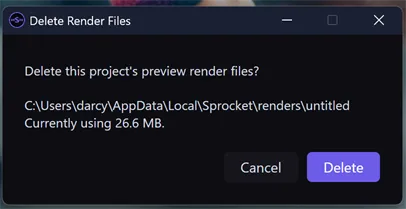
Click Delete and the status bar reports what it reclaimed — for example, Deleted render files — reclaimed 1.4 GB. The rendered ranges turn back to amber or red and will play live again until you render them once more. Nothing in your project is affected — only the saved renders are removed.
Tip: Deleting render files also clears any audio you’ve frozen with Freeze Clip Audio, since frozen audio is saved in the same render cache. Those clips will mix live again until you freeze or render them again.
Proxies are kept in a separate cache and aren’t touched by Delete Render Files — they regenerate on their own as needed, so there’s rarely a reason to clear them by hand. You can clear both the render cache and the proxy cache from the Caches section of Preferences if you ever need to.
Related
Section titled “Related”- Troubleshooting choppy playback — use the Playback Statistics window to see why the preview is stuttering.
- Freeze a heavy audio chain — pre-render the audio on a single clip.
- In and out marks — set the range that Render In to Out uses.